iOS
Before starting your application instrumentation, ensure that you have created an app and have an appKey
Install
We strongly recommend using CocoaPods when installing the Pyze SDK as it is the easiest and ensures you are using the latest stable version. However, if you do not want to use Cocoapods you can install the Pyze Framework manually.
Using Cocoapods
You can find detailed instructions for installing and setting up CocoaPods at the CocoaPods website. Please follow those instructions and return here.
Add the following to your podFile:
pod 'pyze-sdk-iOS'
pod 'pyze-sdk-tvOS'
pod 'pyze-sdk-watchOS'
pod 'pyze-sdk-iOS7'
Run pod install in your project directory
You should see this output:
Pod installation complete! There is 1 dependency from the Podfile and 1 total pod installed.
Note
This sets up an Xcode workspace for your project. You must open your project in Xcode using the generated.xcworkspace rather than the .xcodeproj file.
Using Swift?
If you are using Swift, also add the following line (if missing) to your Podfile. Note the exclamation mark.
use_frameworks!
Manual Installation
We strongly recommend using CocoaPods when installing the Pyze SDK as it is the easiest and ensures you are using the latest stable version. However, if you do not want to use Cocoapods, use the Pyze Framework to install the SDK manually, as shown below.
Download the appropriate framework:
github.com/pyze/iOS-Library-iOS7 (legacy iOS)
Import into Xcode
Drag and Drop the Pyze.framework from your Downloads folder into your project directory within Xcode.
Note: If targeting watchOS, Select ‘YourApp WatchKit Extension’ as drop target
Select following options:
- Destination:
- Copy items into destination group’s folder (if needed)
- Folders:
- Create group for any added folders options
Add Frameworks (iOS and tvOS only)
Add following frameworks to your target. If you are new to iOS please refer to the Apple documentation here.
-
CoreTelephony used to report the carrier operator information like the name, capabilities, country code
-
SystemConfiguration used to detect system errors and changes in ability to reach the internet
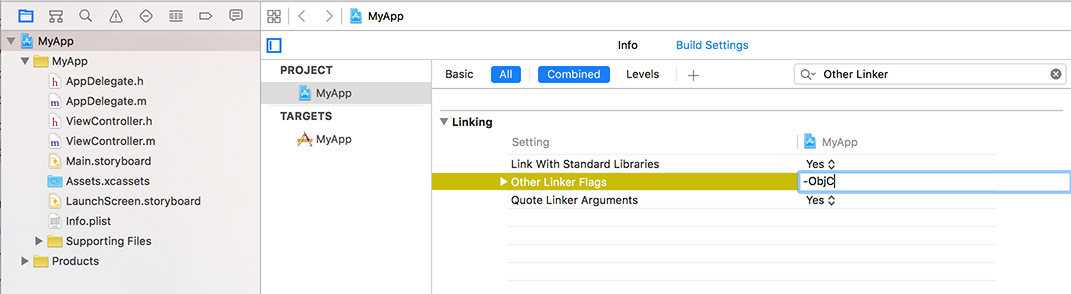
Add -ObjC linker flag
Add -ObjC linker flag to project’s target.
- In Xcode, choose View > Navigators > Show Project Navigator, or press ⌘1.
- Select your project under the PROJECT heading in the Project Navigator, then select the Build Settings tab and All sub tab.
- Scroll down to the Other Linker Flags build setting under the Linking collection or type “Other Linker Flags” into the search bar.
- Set the value of the Other Linker Flags build setting to exactly -ObjC
Screenshot:
5.Include in ‘Embedded Binaries’
- Select Project target > Goto General > ‘Embedded Binaries’
- Click on the ‘+’ icon
- Select ‘Pyze.framework’
- Click on ‘Add’
Initialize
Swift
Open AppDelegate.swift (iOS & tvOS) or ExtensionDelegate.swift (watchOS) in the project and import Pyze module
import Pyze
iOS & tvOS Open the AppDelegate.swift file and add the following lines in your func application(application:, willFinishLaunchingWithOptions: function
Warning
For iOS and tvOS, add code in willFinishLaunchingWithOptions and NOT didFinishLaunchingWithOptions.func application(_ application: UIApplication, willFinishLaunchingWithOptions launchOptions: [UIApplicationLaunchOptionsKey : Any]? = nil) -> Bool {
Pyze.initialize("PYZE_APP_KEY", withLogThrottling: .PyzelogLevelMinimal)
return true
}
func application(application: UIApplication, willFinishLaunchingWithOptions launchOptions: [NSObject : AnyObject]?) -> Bool {
    Pyze.initialize("PYZE_APP_KEY", withLogThrottling: .PyzelogLevelMinimal)
    return true
}
watchOS Open the ExtensionDelegate.swift file and add the following lines in your func applicationDidFinishLaunching() function
For watchOS, add code in didFinishLaunchingWithOptions
/// Swift (watchOS)
func applicationDidFinishLaunching() {
    Pyze.initialize("PYZE_APP_KEY",
        withLogThrottling: .PyzelogLevelMinimal)
}
Warning
Make sure you replacedPYZE_APP_KEY with your own appKey
Objective-C
Open your AppDelegate.m (iOS & tvOS) or ExtensionDelegate.m (watchOS) in the project and import Pyze module
#import <Pyze/Pyze.h>
iOS and tvOS - Add following lines in application:willFinishLaunchingWithOptions: method in the @implementation block of your App delegate code file. (usually AppDelegate.m ). If you do not have application:willFinishLaunchingWithOptions: method in your class simply add it.
Warning
For iOS and tvOS, add code in willFinishLaunchingWithOptions and NOT didFinishLaunchingWithOptions.- (BOOL)application:(UIApplication*)application willFinishLaunchingWithOptions:(NSDictionary*)launchOptions {
[Pyze initialize:@"PYZE_APP_KEY"
withLogThrottling: PyzelogLevelMinimal]; //see https://growth.pyze.com
return YES;
}
watchOS - Add following lines in application:applicationDidFinishLaunching: method in the @implementation block of your Extension delegate code file. (usually ExtensionDelegate.m ).
// Objective C (watchOS)
- (void)applicationDidFinishLaunching {
    [Pyze initialize:@"PYZE_APP_KEY"
        withLogThrottling: PyzelogLevelMinimal];
}
Warning
Make sure you replacedPYZE_APP_KEY with your own appKey
Custom Events
Custom events allow you to easily track unique user actions within your app.
Events with Attributes
This allows you to track when a user executed an action, for a simple count of how often that event is occurring.
Attributes are any key-value pair that you can attach to an event. You can have up to 99 attributes with any event. It is highly recommended to follow our Best Practices and heavily rely on attributes to make your instrumentation as minimal and useful as possible. In a typical application, you should have many more attributes than events.
[PyzeCustomEvent postWithEventName:@"My Blog Read Event"
    withAttributes:@{
        @"Author" : @"nav iosnavtabsS",
        @"User Status" : @"Registered",
        @"Article Source" : @"https://blog.pyze.com",
        @"Publish Time" : @"2015-12-17"}];

// Alternate way to pass value1,key1, value2,key2 ...
NSDictionary * attributes = [NSDictionary dictionaryWithObjectsAndKeys:
    @"nav iosnavtabsS", @"Author",
    @"Registered", @"User Status",
    @"blog.pyze.com", @"Article Source",
    @"2015-12-17", @"Publish Time",
    nil];
[PyzeCustomEvent postWithEventName:@"Blog Read" withAttributes:attributes];
PyzeCustomEvent.postWithEventName("Blog Read",
    withAttributes: ["Author": "nav iosnavtabsS", "User status":  "Registered",
    "Article Source": "CNN", "Publish Time": "12-17-2015"])

// Alternate way to pass value1,key1, value2,key2 ...
let attributes: [NSObject : AnyObject] = [
    "Author" : "nav iosnavtabsS",
    "User_Status" : "Registered",
    "CNN" : "Article Source",
    "12-17-2015" : "Publish Time"
]

PyzeCustomEvent.postWithEventName("Blog Read", withAttributes: attributes)
PyzeCustomEvent.post(withEventName: "Blog Read", withAttributes: ["Author": "nav iosnavtabsS", "User status":  "Registered", "Article Source": "CNN", "Publish Time": "12-17-2015"])

// Alternate way to pass value1,key1, value2,key2 ...
let attributes: [AnyHashable : Any] = [
    "Author" : "nav iosnavtabsS",
    "User_Status" : "Registered",
    "CNN" : "Article Source",
    "12-17-2015" : "Publish Time"
]

PyzeCustomEvent.post(withEventName: "Blog Read", withAttributes: attributes)
Timed Events
Timing how long a user takes to complete an action is a common usecase for Pyze. The SDk has built-in handling for this, by allowing you to start a timer, and then send a custom event at the completion of that action.
startTimerForEvent- Start the timer with a namepostTimedEvent- End the timer by referencing the same name. The time in milliseconds will automatically be attached to this event.postTimedEventWithAttributes- End the timer by referencing the same name and attaching any attributes as well. The time in milliseconds will automatically be attached to this event.
//Start timer for event
[PyzeCustomEvent startTimerForEvent:@"Screen Load Time"];

//Post timed event.
//Note : The event name attribute for the `startTimerForEvent` and  `postTimedEvent` should match.
[PyzeCustomEvent postTimedEvent:@"Screen Load Time"];

//Post timed event with attributes
[PyzeCustomEvent postTimedEvent:@"Screen Load Time" withAttributes:@{
    @"device" : @"iPhone 6s",
    @"location" : @"CA"
}];
//Start timer for event
PyzeCustomEvent.startTimer(forEvent: "Screen Load Time")

//Post timed event.
//Note : The event name attribute for the `startTimerForEvent` and  `postTimedEvent` should match.
PyzeCustomEvent.postTimedEvent("Screen Load Time")

//Post timed event with attributes
PyzeCustomEvent.postTimedEvent(
    "Screen Load Time",
    withAttributes: [
        "device": "iPhone 6s",
        "location": "CA"
    ])
Profile
Profiles are a powerful way to add data about your users to Pyze. Use profiles to add data that is not specific to a point in time (events) and are attached to a specific user.
When a user logs in to your app, call setUserProfile to identify them to Pyze. Any events that happen after they are identified, will be attributed to this user. You should only call this method once upon the initial login of a session.
You can optionally include profile attributes.
Pyze built-in profile attributes get special handling in the pyze UI, and we will attempt to discern the data type for custom attributes based on the data recieved. There is no difference between the built-in attributes and custom ones outside of formatting applied.
//Create Pyze Profile Attributes object
//Create Custom Profile Attributes object
//Call the setUserProfile API
[PyzeIdentity setUserProfile:@"" pyzeProfileAttributes:@{
    @"email_id"        : @"xyz@abc.com",
    @"date_of_birth"   : @"1984-06-01",
    @"first_name"      : @"John",
    @"last_name"       : @"Jacobs"
} customProfileAttributes:@{
    @"age"       : @29,
    @"pincode"   : @"23200",
    @"city"      : @"XYZ"
}];
Pyze profile attributes
| Pyze User Profile Field Name | Data Type/Description |
|---|---|
| background | (string) User background, biography or historical data |
| country | (string) Country codes must be sent in the ISO-3166-1 alpha-2 standard. |
| current_location | (object) Format: {“longitude”: -33.991894, “latitude”: 25.243732} |
| date_of_first_use | (date at which the user first used the app) String in ISO 8601 format or in yyyy-MM-dd’T’HH:mm:ss.SSSZ format. |
| date_of_last_use | (date at which the user last used the app) String in ISO 8601 format or in yyyy-MM-dd’T’HH:mm:ss.SSSZ format. |
| date_of_birth | (date of birth) String in format “YYYY-MM-DD”, example: 1984-06-01. |
| email_id | (string) Email Id |
| email_subscribe | (string) Acceptable values are “opt_in” (explicit approval to receive email messages), “opt_out” (explicit denial to email messages), and “subscribed” (neither opted in nor out). |
| email_hard_bounced | Automatically updated when a hard bounce occurs (true or false) |
| email_spam_reported | Automatically updated when a user marks your email as spam, via the ISP (true or false) |
| facebook_id | facebook ID |
| first_name | (string) User’s First name |
| gender | (string) “M”, “F”, “O” (other), “N” (not applicable), “P” (prefer not to say) or “U” (unknown). |
| home_city | (string) User’s Home City |
| image_url | (string) URL of image to be associated with the user |
| language | (string) Require language to be sent in the ISO-639-1 standard. |
| last_name | (string) User’s Last Name |
| marked_email_as_spam_at | (string) Date at which the user’s email was marked as spam. Must be in ISO 8601 format or in yyyy-MM-dd’T’HH:mm:ss.SSSZ format. |
| phone | (string) Phone number |
| push_subscribe | (string) Available values are “opted_in” (explicitly registered to receive push messages), “unsubscribed” (explicitly opted out of push messages), and “subscribed” (neither opted in nor out). |
| push_tokens | Array of objects with app_id and token string. You may optionally provide a device_id for the device this token is associated with, e.g., [{“app_id”: App Identifier, “token”: “abcd”, “device_id”: “optional_field_value”}]. If a device_id is not provided, one will be randomly generated. |
| time_zone | (string) Time Zone’s must be sent as per IANA Time Zone Database (e.g., “America/New_York” or “Eastern Time (US & Canada)”). Only valid values will be respected. |
| twitter_id | Twitter ID |
Updating an existing user Profile
To update user profile attributes which are already set, use the following api.
Note : Do not call this api before calling setUserProfile.
//Create Pyze Profile Attributes object
//Create Custom Profile Attributes object
//Call the updateUserProfile API
[PyzeIdentity updateUserProfile:@"" pyzeProfileAttributes:@{
    @"email_id"        : @"xyz@abc.com",
    @"date_of_birth"   : @"1984-06-01",
    @"first_name"      : @"John",
    @"last_name"       : @"Jacobs"
} customProfileAttributes:@{
    @"age"       : @29,
    @"pincode"   : @"23200",
    @"city"      : @"XYZ"
}];
Logging out a user
Call this api when a user logs out. Event sent after this call will have no identity attached, and will be attributed to an anonymous user.
[PyzeIdentity resetUserProfile];
User Privacy
Pyze provides APIs to allow end-users to Opt out of Data Collection and also instruct the Pyze system to forget a user’s data.
setUserOptOut
Allows end-users to opt out from data collection. Opt-out can be toggled true or false.
[Pyze setUserOptOut:true];
Pyze.setUserOptOut(true)
To resume user data collection set value to false
deleteUser
Allows end-users to opt out from data collection and delete the user in the Pyze system. We recommend you confirm this action as once a user is deleted, this cannot be undone.
[Pyze deleteUser:true];
Pyze.deleteUser(true)
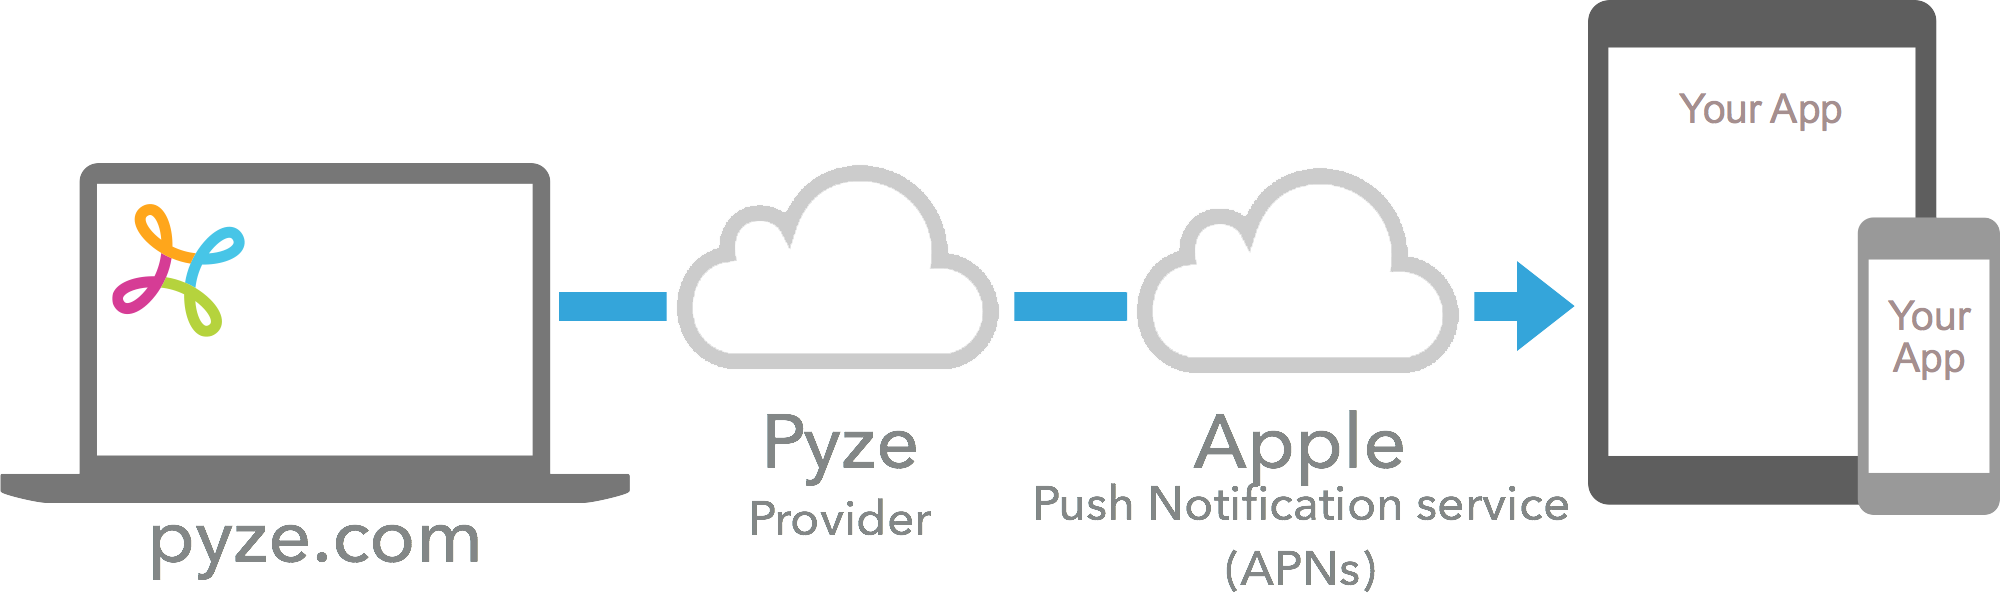
Push Notifications
Apple provides the Apple Push Notification Service (APNS) to allow app publishers to reach out to their users via push notifications.
1. Generate P12 Certificate
- Go to
Certificates, Identifiers & Profilespage of your apple developer account. - Select
Identifiersand go toYOUR_APP_IDENTIFIER. - Under
Capabilitiesgo toPush Notificationsand selectConfigure - Now under Development/Production SSL Certificate select
Create Certificate - Upload the
Certificate Signing Requestas mentioned here - Download the certificate generated and add to the
Keychain Access - Now select the certificate just imported and choose
Export. - Enter the password and save the
.p12to the desired location.
2. Configure Pyze as your provider
In order to allow Pyze to send push notifications on your behalf to users of your app, please provide the iOS push certificate to Pyze.
- Login to growth.pyze.com
- Click Settings from the Navigation Pane
- Select the app you want to provide keys for from the drop down list
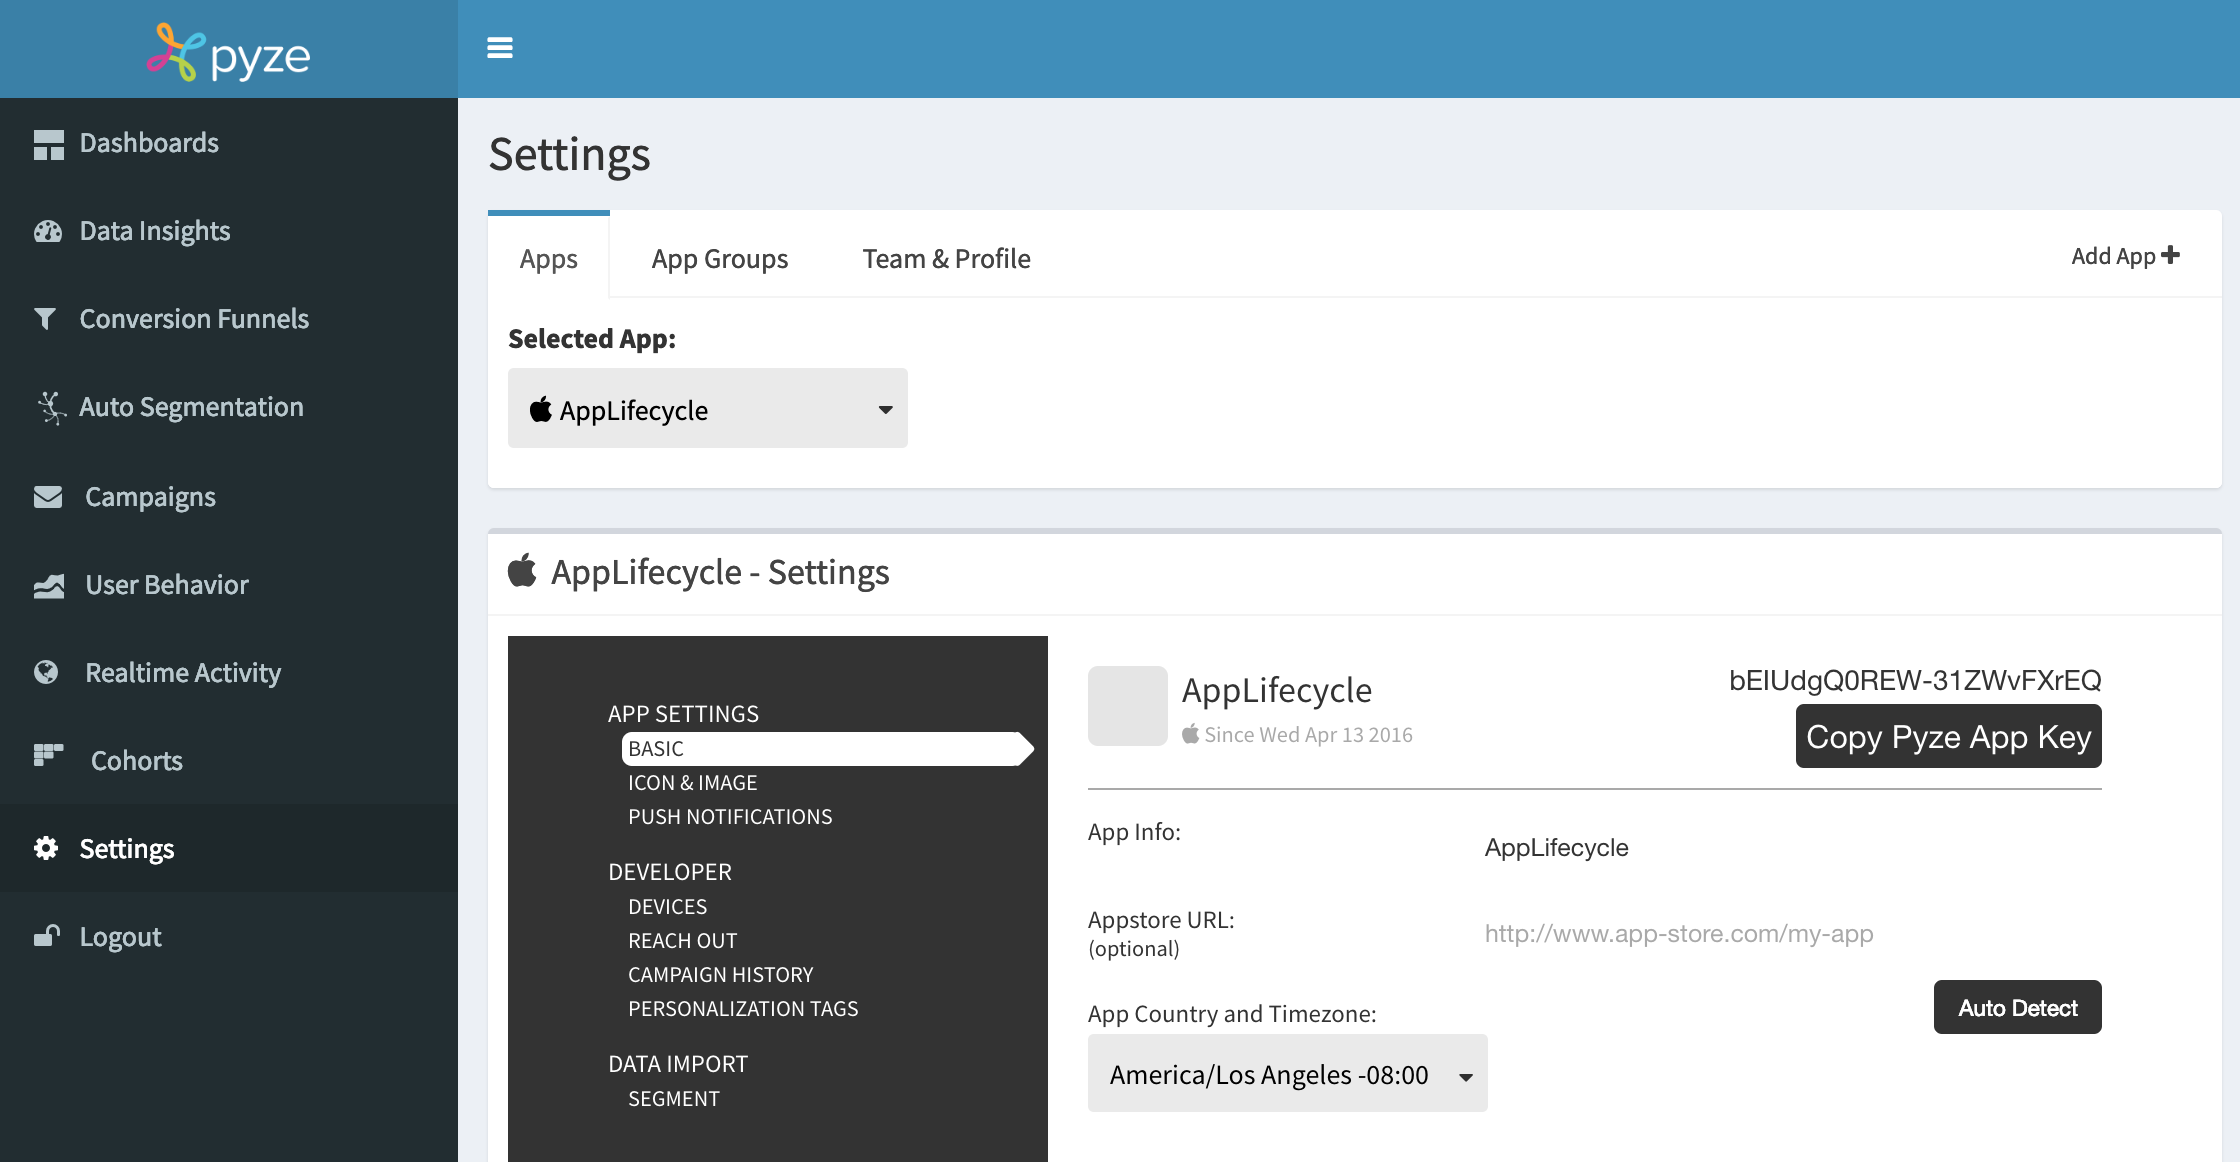
- Select Push Notifications on the left menu
- Upload a Push notifications certificate in .p12 format, provide p12 password (the password you generated while creating the certificate), and specify the provisioning mode: Development or Production depending on the type of certificate you are using.
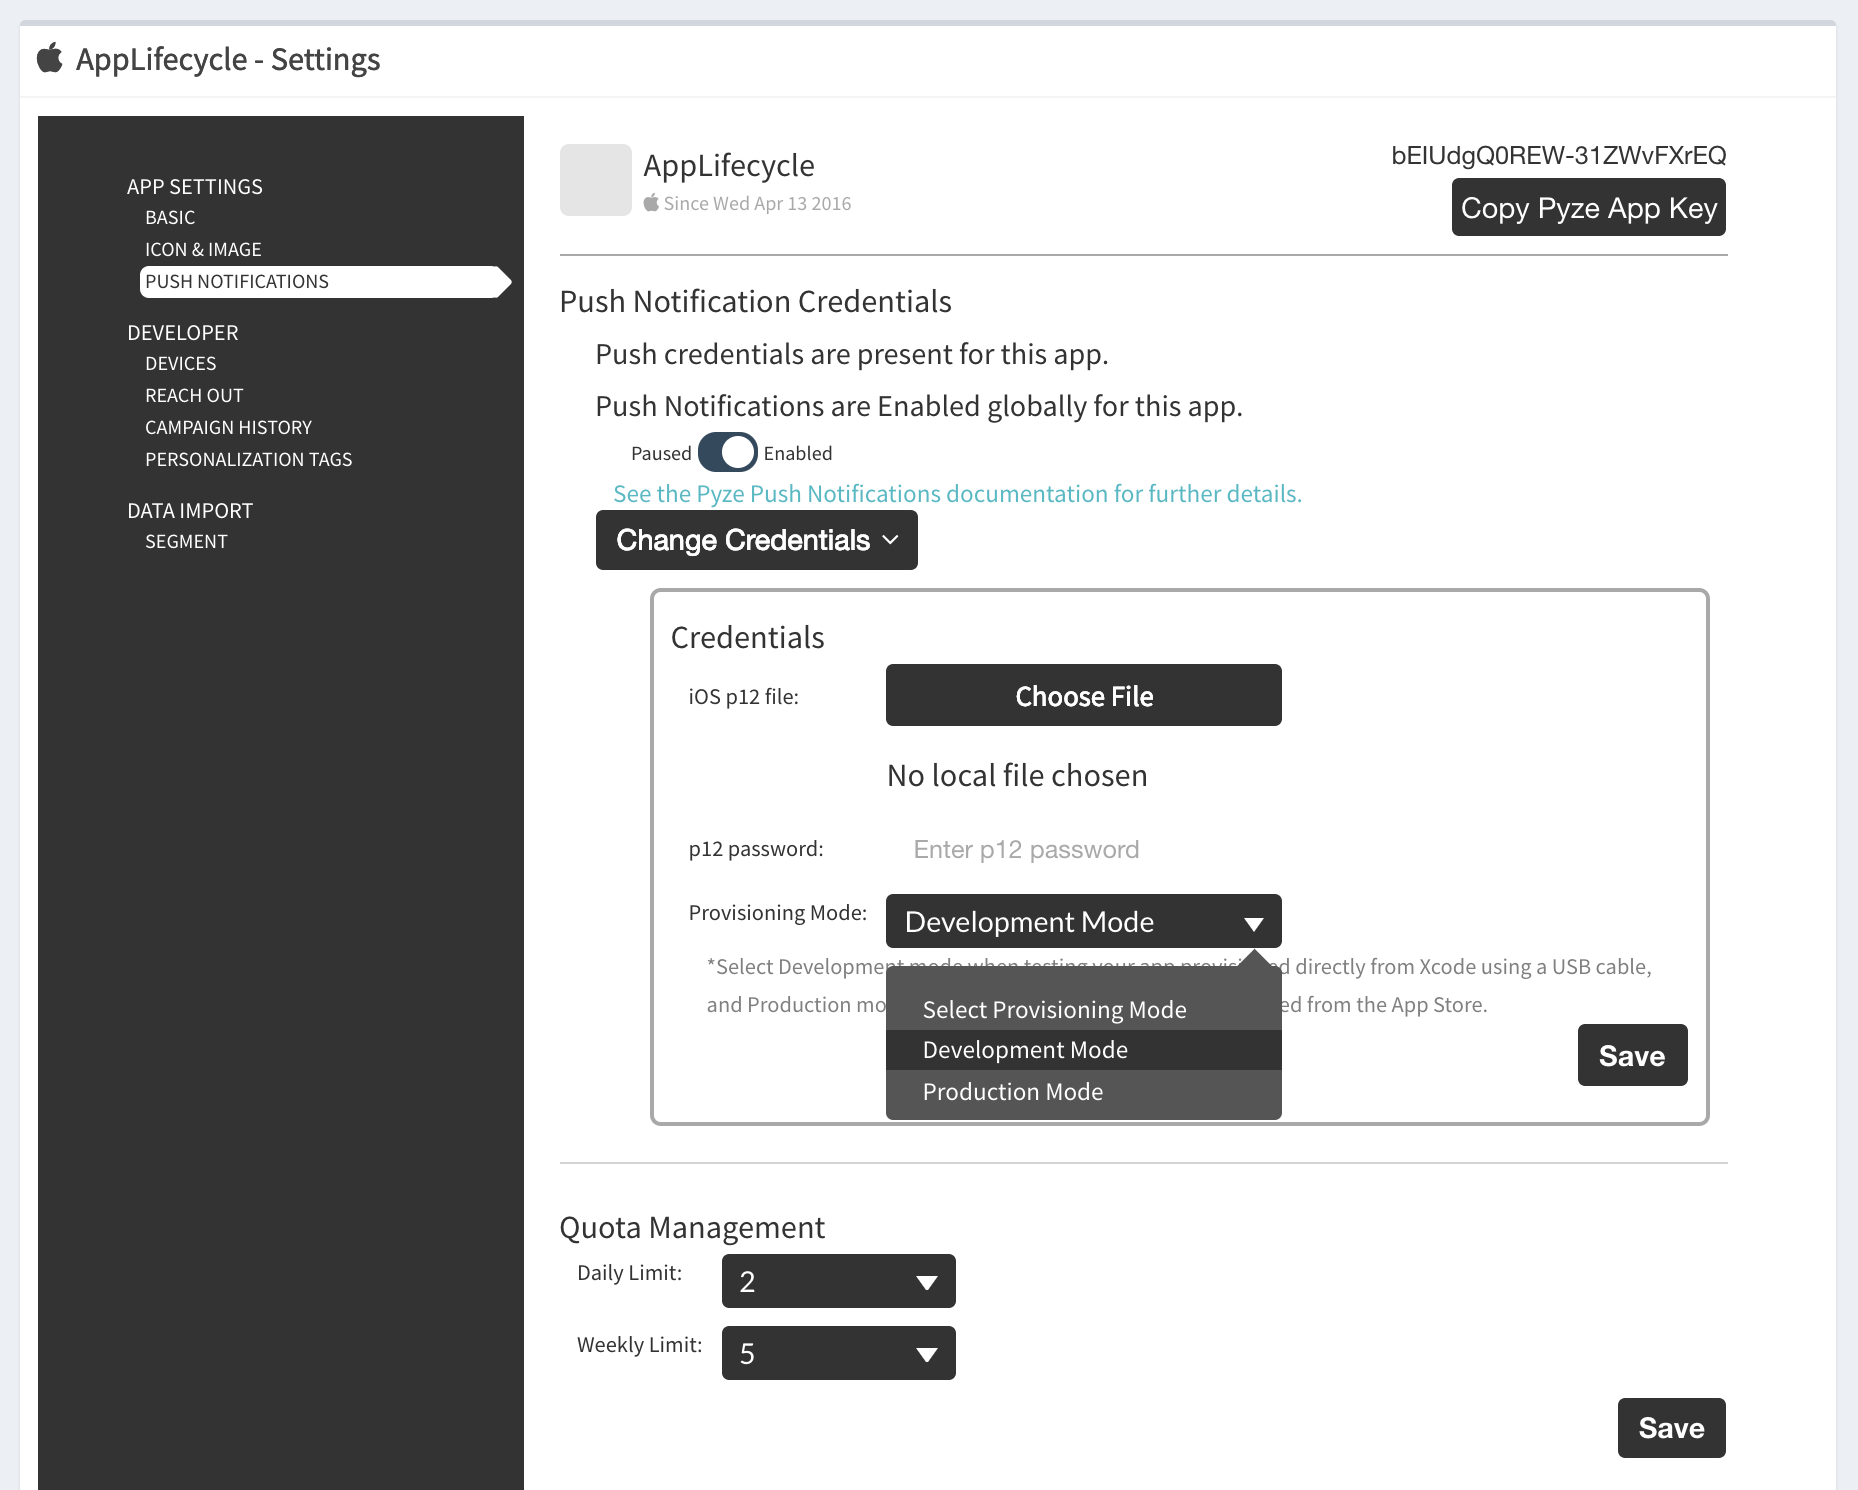
- Select daily and weekly quota limits
- Click Save
3. Enabling Push Notifications
- Goto to capability under application target, add capability
Push NotificationsandBackground Modes. - Under
Background ModescheckRemote notifications.
4. Modify AppDelegate
Update AppDelegate as shown below
@import Pyze;
#import <UserNotifications/UserNotifications.h>

@import CoreMotion;

//Let AppDelegate inherit UNUserNotificationCenterDelegate
@interface ALAppDelegate () <UNUserNotificationCenterDelegate>
@end

@implementation ALAppDelegate

//Initialize Pyze
- (BOOL)application:(UIApplication *)application willFinishLaunchingWithOptions:(NSDictionary *)launchOptions {
    [Pyze initialize:@"PYZE_APP_KEY" withLogThrottling: PyzelogLevelMinimal];
    return YES;
}

//Register for remote notification
- (BOOL)application:(UIApplication *)application didFinishLaunchingWithOptions:(NSDictionary *)launchOptions{
    [[UNUserNotificationCenter currentNotificationCenter] requestAuthorizationWithOptions:(UNAuthorizationOptionAlert +UNAuthorizationOptionSound) completionHandler:^(BOOL granted, NSError * _Nullable error) {}];
    [UNUserNotificationCenter currentNotificationCenter].delegate = self;
    [[UNUserNotificationCenter currentNotificationCenter] setNotificationCategories:[PyzeNotification getPyzeDefaultNotificationCategories]];
    [[UIApplication sharedApplication] registerForRemoteNotifications];
    [PyzeNotification initWithLaunchOptions:launchOptions];
    return YES;
}

//Set remote notification token to Pyze
- (void)application:(UIApplication *)application didRegisterForRemoteNotificationsWithDeviceToken:(NSData *)deviceToken {
    [Pyze setRemoteNotificationDeviceToken:deviceToken];
}

//Notify Pyze when push received.
- (void)application:(UIApplication *)application didReceiveRemoteNotification:(NSDictionary *)userInfo fetchCompletionHandler:(void (^)(UIBackgroundFetchResult))completionHandler{
    [Pyze processReceivedRemoteNotification:userInfo withState:[[UIApplication sharedApplication] applicationState] withCompletionHandler:completionHandler];
}

//Let pyze handle the remote notification action
-(void)userNotificationCenter:(UNUserNotificationCenter *)center didReceiveNotificationResponse:(UNNotificationResponse *)response withCompletionHandler:(void (^)(void))completionHandler{
    [PyzeNotification handlePushNotificationResponseWithUserinfo:response.notification.request.content.userInfo actionIdentifier:response.actionIdentifier];
    completionHandler();
}

//Enable app to view notification in foreground
-(void)userNotificationCenter:(UNUserNotificationCenter *)center willPresentNotification:(UNNotification *)notification withCompletionHandler:(void (^)(UNNotificationPresentationOptions))completionHandler {
    completionHandler(UNNotificationPresentationOptionAlert);
}

@end
import Pyze
import UserNotifications

//Let AppDelegate inherit UNUserNotificationCenterDelegate
@UIApplicationMain
class AppDelegate: UIResponder, UIApplicationDelegate, UNUserNotificationCenterDelegate {

    //Initialize Pyze
    func application(_ application: UIApplication, willFinishLaunchingWithOptions launchOptions: [UIApplication.LaunchOptionsKey : Any]? = nil) -> Bool {
        Pyze.initialize("PYZE_APP_KEY", withLogThrottling: .PyzelogLevelMinimal)
        return true
    }

    //Register for remote notification
    func application(_ application: UIApplication, didFinishLaunchingWithOptions launchOptions: [UIApplication.LaunchOptionsKey: Any]?) -> Bool {
        UNUserNotificationCenter.current().delegate = self;
        UNUserNotificationCenter.current().requestAuthorization(options:[.badge, .alert, .sound]) { granted, error in }
        UNUserNotificationCenter.current().setNotificationCategories(PyzeNotification.getPyzeDefaultNotificationCategories() as! Set<UNNotificationCategory>);
        UIApplication.shared.registerForRemoteNotifications();
        PyzeNotification.initWithLaunchOptions(launchOptions);
        return true
    }

    //Set remote notification token to Pyze
    func application(_ application: UIApplication, didRegisterForRemoteNotificationsWithDeviceToken deviceToken: Data) {
        Pyze.setRemoteNotificationDeviceToken(deviceToken);
    }

    //Notify Pyze when notification received
    func application(_ application: UIApplication, didReceiveRemoteNotification userInfo: [AnyHashable : Any], fetchCompletionHandler completionHandler: @escaping (UIBackgroundFetchResult) -> Void) {
        Pyze.processReceivedRemoteNotification(userInfo, with: application.applicationState, withCompletionHandler: completionHandler)
    }

    //Let pyze handle the remote notification action
    func userNotificationCenter(_ center: UNUserNotificationCenter, didReceive response: UNNotificationResponse, withCompletionHandler completionHandler: @escaping () -> Void) {
        PyzeNotification.handlePushResponse(withUserinfo: response.notification.request.content.userInfo, actionIdentifier: response.actionIdentifier)
        completionHandler()
    }

    //Enable app to view notification in foreground
    func userNotificationCenter(_ center: UNUserNotificationCenter, willPresent notification: UNNotification, withCompletionHandler completionHandler: @escaping (UNNotificationPresentationOptions) -> Void) {
        completionHandler(.alert);
    }
}
5. Enable Rich Push Notification for your app.
Enable your app to receive images and gifs inside push notification messages.
- Go to
File->New->Targetand create aNotification Service Extension. - Fill the
Product Nameand select required language. - Make sure to select
Embed in ApplicationasYOUR PROJECT. - XCode will create a
NotificationServiceclass after adding the above extension. Replace its content by below code.
#import "NotificationService.h"

@interface NotificationService ()

@property (nonatomic, strong) void (^contentHandler)(UNNotificationContent *contentToDeliver);
@property (nonatomic, strong) UNMutableNotificationContent *bestAttemptContent;

@end

@implementation NotificationService

- (NSURL *) attachmentFileURLWithTempLocation:(NSURL *)location name:(NSString *)fileName {
    NSFileManager *fileManager = [NSFileManager defaultManager];
    NSError *error;
    NSArray * domainDirectories = NSSearchPathForDirectoriesInDomains(NSDocumentDirectory, NSUserDomainMask, YES);
    NSString *documentsDirectory = [domainDirectories objectAtIndex:0];
    NSString *attachmentLocalFilePath = [documentsDirectory stringByAppendingPathComponent:@"/Pyze/"];
    if(![fileManager fileExistsAtPath:attachmentLocalFilePath]) [fileManager createDirectoryAtPath:attachmentLocalFilePath withIntermediateDirectories:NO attributes:nil error:&error];
    attachmentLocalFilePath =  [attachmentLocalFilePath stringByAppendingFormat:@"/%@",fileName];
    if([fileManager fileExistsAtPath:attachmentLocalFilePath]) {
        [fileManager removeItemAtPath:attachmentLocalFilePath error:&error];
        if (error) NSLog(@"Error in removing file : %@", error.debugDescription);
    }
    [fileManager moveItemAtPath:[location path] toPath:attachmentLocalFilePath error:&error];
    if (error) NSLog(@"Error in moving file to location : %@", error.debugDescription);
    NSURL *mediaFileURL = [NSURL fileURLWithPath:attachmentLocalFilePath];
    return mediaFileURL;
}

- (NSURLSessionDownloadTask *) loadAttachmentsWithURLString:(NSString *)urlString {
    NSURL *mediaURL = [NSURL URLWithString:urlString];
    NSURLSessionDownloadTask *task = [[NSURLSession sharedSession] downloadTaskWithURL:mediaURL completionHandler:^(NSURL * _Nullable location, NSURLResponse * _Nullable response, NSError * _Nullable error) {
          if (!error) {
              NSURL *mediaFileURL = [self attachmentFileURLWithTempLocation:location name:[response suggestedFilename]];
              UNNotificationAttachment *attachment = [UNNotificationAttachment attachmentWithIdentifier:[response suggestedFilename] URL:mediaFileURL options:nil error:&error];
              if (attachment) self.bestAttemptContent.attachments = @[attachment];
              self.contentHandler(self.bestAttemptContent);
          }
      }];
    return task;
}

#pragma mark - UNNotificationServiceExtension delegate

- (void)didReceiveNotificationRequest:(UNNotificationRequest *)request withContentHandler:(void (^)(UNNotificationContent * _Nonnull))contentHandler {
    self.contentHandler = contentHandler;
    self.bestAttemptContent = [request.content mutableCopy];
    self.bestAttemptContent.title = self.bestAttemptContent.title;
    self.bestAttemptContent.subtitle = self.bestAttemptContent.subtitle;
    NSString *mediaUrlString = request.content.userInfo[@"mediaUrl"];
    NSURLSessionDownloadTask *task = [self loadAttachmentsWithURLString:mediaUrlString];
    [task resume];
}

- (void)serviceExtensionTimeWillExpire {
    // Called just before the extension will be terminated by the system.
    // Use this as an opportunity to deliver your "best attempt" at modified content, otherwise the original push payload will be used.
    self.contentHandler(self.bestAttemptContent);
}

@end
import UserNotifications

class NotificationService: UNNotificationServiceExtension {

    var contentHandler: ((UNNotificationContent) -> Void)?
    var bestAttemptContent: UNMutableNotificationContent?

    override func didReceive(_ request: UNNotificationRequest, withContentHandler contentHandler: @escaping (UNNotificationContent) -> Void) {
        self.contentHandler = contentHandler
        bestAttemptContent = (request.content.mutableCopy() as? UNMutableNotificationContent)
        defer {
            contentHandler(bestAttemptContent ?? request.content)
        }
        guard let attachment = request.attachment else { return }
        bestAttemptContent?.attachments = [attachment]
    }

    override func serviceExtensionTimeWillExpire() {
        // Called just before the extension will be terminated by the system.
        // Use this as an opportunity to deliver your "best attempt" at modified content, otherwise the original push payload will be used.
        if let contentHandler = contentHandler, let bestAttemptContent =  bestAttemptContent {
            contentHandler(bestAttemptContent)
        }
    }
}

extension UNNotificationRequest {
    var attachment: UNNotificationAttachment? {
        guard let attachmentURL = content.userInfo["mediaUrl"] as? String, let imageData = try? Data(contentsOf: URL(string: attachmentURL)!) else {
            return nil
        }
        return try? UNNotificationAttachment(data: imageData, options: nil)
    }
}

extension UNNotificationAttachment {
    convenience init(data: Data, options: [NSObject: AnyObject]?) throws {
        let fileManager = FileManager.default
        let temporaryFolderName = ProcessInfo.processInfo.globallyUniqueString
        let temporaryFolderURL = URL(fileURLWithPath: NSTemporaryDirectory()).appendingPathComponent(temporaryFolderName, isDirectory: true)
        try fileManager.createDirectory(at: temporaryFolderURL, withIntermediateDirectories: true, attributes: nil)
        let imageFileIdentifier = UUID().uuidString + ".jpg"
        let fileURL = temporaryFolderURL.appendingPathComponent(imageFileIdentifier)
        try data.write(to: fileURL)
        try self.init(identifier: imageFileIdentifier, url: fileURL, options: options)
    }
}
In-App Notifications
In-app notifications allow app businesses to reach out to app users when they use your app. In-App notifications are built-in to the pyze sdk and have no additional dependecies.businesses to reach out to users from manually from Dynamic Funnels and Intelligence Explorer, and automatically based on workflows and campaigns from Growth Automation. In-App notifications can be sent from Campaigns Call the following methed, wherever you want to check for new messages and pop-up a modal with the notification:
[Pyze showInAppNotification];
Debugging and Logging
Setting the log level
The Initialize API accepts an optional 2nd parameter to set the loglevel. To control the debug log level.
The Default log level for the Pyze SDK is Minimal.
Following are the logging level options you could use.
PyzelogLevelMinimal
PyzelogLevelWarnings
PyzelogLevelErrors
PyzelogLevelAll
Troubleshooting Guide
- Missing Frameworks
If you chose to install the Pyze Framework manually and forgot to add frameworks CoreTelephony and SystemConfiguration, following compilation errors will occur.
 "_CNCopyCurrentNetworkInfo", referenced from: ...
 "_CNCopySupportedInterfaces", referenced from: ...
 "_OBJC_CLASS_$_CTTelephonyNetworkInfo", referenced from: ...
 "_SCNetworkReachabilityCreateWithAddress", referenced from: ...
 "_SCNetworkReachabilityCreateWithName", referenced from: ...
 "_SCNetworkReachabilityScheduleWithRunLoop", referenced from: ...
 "_SCNetworkReachabilitySetCallback", referenced from: ...
 "_SCNetworkReachabilityUnscheduleFromRunLoop", referenced from: ...
Resolution: Add frameworks CoreTelephony and SystemConfiguration
- Missing CoreTelephony framework
Missing CoreTelephony framework would generate the following compilation errors.
"_OBJC_CLASS_$_CTTelephonyNetworkInfo", referenced from: ...
"_CNCopySupportedInterfaces", referenced from: ...
Resolution: Add CoreTelephony framework
- Missing SystemConfiguration framework
Missing SystemConfiguration framework would generate the following compilation errors.
"_SCNetworkReachabilityCreateWithAddress", referenced from: ...
"_SCNetworkReachabilityCreateWithName", referenced from: ...
"_SCNetworkReachabilityScheduleWithRunLoop", referenced from: ...
"_SCNetworkReachabilitySetCallback", referenced from: ...
"_SCNetworkReachabilityUnscheduleFromRunLoop", referenced from: ...
Resolution: Add SystemConfiguration framework
- Following exception will be raised by calling empty PyzeAppKey passed to
initializeWithKeymethod.
*** Terminating app due to uncaught exception 'NSInternalInconsistencyException',
reason: 'PyzeAppKey needs to be set via initializeWithKey: method.
Log on to growth.pyze.com to get it.'
-
Screen flows will not automatically get updated at growth.pyze.com if you have missed adding
ObjCvalue toOther Linker FlagsunderLinkingof your project’s build settings.Resolution: Add
ObjCflag -
Following error will be shown upon compiling your project if you are using Cocoapods and opened
.xcodeprojinstead of.xcworkspace.
*** ld: library not found for -lPods-Project_Name-ObjC
clang: error: linker command failed with exit code 1 (use -v to see invocation)
- If you encounter following error while using Cocoapods, please ensure that your deployment target is set to 8.0.
Specs satisfying the `pyze-sdk-iOS` dependency were found, but they required a higher minimum deployment target.
- If you get a build spec validation error in cocoapods while installing or updating Pyze SDK as show below, please either change the target in your app to iOS 8 (from iOS 7), or use the framework version of Pyze from GitHub. See here for installing Pyze using Framework.
ERROR | [iOS] dynamic: Dynamic frameworks and libraries are not supported on iOS 8.0 and onwards
- If you get ‘Image not found’ error while running as shown below, ensure that
@executable_path/Frameworksis added toRunpath Search PathsunderLinkingsection of your project build settings. This usually happens if you created Xcode project version 5.x or 6.x.
dyld: Library not loaded: @rpath/Pyze.framework/Pyze
Referenced from: <path_to_your_app>
Reason: image not found
More info provided in this link
- If you encounter errors like
fatal error: lipo: can't open input file:then go to Xcode project target settings and changeBuild Active Architecture onlyto YES.
AppStore Submission
Before submitting your app to the AppStore (especially through Application Loader.app) we need to get rid of the simulator binaries, to achieve this please follow the below steps.
- Go to your project target
- Navigate to Build phase
- Click ‘+’ to add ‘New Run script’
- Copy and paste the below script
#**************************************************************************************

echo "Target architectures: $ARCHS"
APP_PATH="${TARGET_BUILD_DIR}/${WRAPPER_NAME}"

find "$APP_PATH" -name '*.framework' -type d | while read -r FRAMEWORK
do
FRAMEWORK_EXECUTABLE_NAME=$(defaults read "$FRAMEWORK/Info.plist" CFBundleExecutable)
FRAMEWORK_EXECUTABLE_PATH="$FRAMEWORK/$FRAMEWORK_EXECUTABLE_NAME"
echo "Executable is $FRAMEWORK_EXECUTABLE_PATH"
echo $(lipo -info "$FRAMEWORK_EXECUTABLE_PATH")

FRAMEWORK_TMP_PATH="$FRAMEWORK_EXECUTABLE_PATH-tmp"

# remove simulator's archs if location is not simulator's directory
case "${TARGET_BUILD_DIR}" in
*"iphonesimulator")
    echo "No need to remove archs"
    ;;
*)
    if $(lipo "$FRAMEWORK_EXECUTABLE_PATH" -verify_arch "i386") ; then
    lipo -output "$FRAMEWORK_TMP_PATH" -remove "i386" "$FRAMEWORK_EXECUTABLE_PATH"
    echo "i386 architecture removed"
    rm "$FRAMEWORK_EXECUTABLE_PATH"
    mv "$FRAMEWORK_TMP_PATH" "$FRAMEWORK_EXECUTABLE_PATH"
    fi
    if $(lipo "$FRAMEWORK_EXECUTABLE_PATH" -verify_arch "x86_64") ; then
    lipo -output "$FRAMEWORK_TMP_PATH" -remove "x86_64" "$FRAMEWORK_EXECUTABLE_PATH"
    echo "x86_64 architecture removed"
    rm "$FRAMEWORK_EXECUTABLE_PATH"
    mv "$FRAMEWORK_TMP_PATH" "$FRAMEWORK_EXECUTABLE_PATH"
    fi
    ;;
esac

echo "Completed for executable $FRAMEWORK_EXECUTABLE_PATH"
echo $(lipo -info "$FRAMEWORK_EXECUTABLE_PATH")

done
#**************************************************************************************
API Reference
Full API reference available here