iOS
アプリケーションのインストルメンテーションを開始する前に、アプリを作成してappKeyがあることを確認してください。
インストール
Pyze SDKをインストールする際には、CocoaPodsを使用することを強くお勧めします。ただし、Cocoapods を使いたくない場合は、Pyze Framework を手動でインストールすることができます。
Cocoapodsの使用方法
CocoaPodsの設置・設定方法は、CocoaPodsのサイトで詳しくご紹介しています。https://guides.cocoapods.org/using/getting-started.htmlそれらの手順に従って、ここに戻ってください。
podFileに以下を追加してください。
pod 'pyze-sdk-iOS'
pod 'pyze-sdk-tvOS'
pod 'pyze-sdk-watchOS'
pod 'pyze-sdk-iOS7'
プロジェクトディレクトリで pod installを実行します
このような出力が表示されるはずです。
Pod installation complete! There is 1 dependency from the Podfile and 1 total pod installed.
留意事項
プロジェクトにXcodeワークスペースを設定します。Xcode でプロジェクトを開くには、.xcodeproj ファイルではなく、生成された .xcworkspace を使用しなければなりません。Swiftを使用していますか?
Swiftを使用している場合は、以下の行をPodfileに追加してください(見つからない場合)。感嘆符に注意してください。
use_frameworks!
マニュアルインストール
Pyze SDKをインストールする際には、CocoaPodsを使用することを強くお勧めします。しかし、CocoaPodsを使用したくない場合は、以下のようにPyze Frameworkを使用してSDKを手動でインストールしてください。
適切なフレームワークをダウンロードします。
github.com/pyze/iOS-Library-iOS7 (legacy iOS)
Xcodeへのインポート
ダウンロードフォルダにあるPyze.frameworkをXcode内のプロジェクトディレクトリにドラッグ&ドロップします。
Note: watchOS をターゲットにしている場合は、YourApp WatchKit Extension をドロップターゲットとして選択してください。
以下のオプションを選択してください。
- コピー先。
- コピー先グループのフォルダにアイテムをコピーします(必要に応じて
- フォルダ。
- 追加されたフォルダオプションのグループを作成
フレームワークの追加(iOSとtvOSのみ)
以下のフレームワークをターゲットに追加します。iOSに慣れていない方はこちらのAppleのドキュメントを参考にしてください。
- CoreTelephonyは、通信事業者の名前、機能、国番号などの情報を報告するために使用されます。
- システムのエラーやインターネットに到達する能力の変化を検出するために使用されるSystemConfiguration
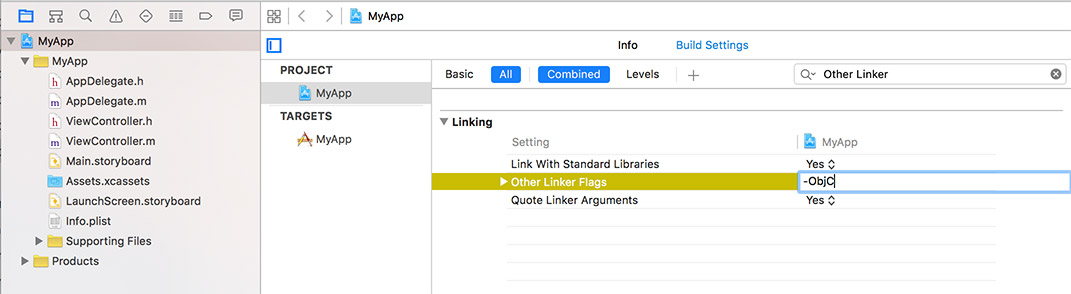
ObjCリンカフラグの追加
Add -ObjC linker flag to project’s target.
プロジェクトのターゲットに -ObjC リンカフラグを追加します。
- Xcodeで、View > Navigators > Show Project Navigatorを選択するか、⌘1を押します。
- プロジェクトナビゲータのプロジェクト見出しでプロジェクトを選択し、ビルド設定タブとすべてのサブタブを選択します。
- Linking コレクションの下の Other Linker Flags ビルド設定までスクロールするか、検索バーに “Other Linker Flags” と入力します。
- Other Linker Flags のビルド設定の値を正確に -ObjC
Screenshot:
5.組み込みバイナリに含める
- プロジェクトターゲットを選択 > 一般 > ‘組み込みバイナリ’を選択
- アイコンをクリックします。
- Pyze.framework」を選択
- 追加」をクリック
初期化
Swift
プロジェクトで AppDelegate.swift (iOS & tvOS) または ExtensionDelegate.swift (watchOS) を開き、Pyze モジュールをインポートします。
import Pyze
iOS & tvOS AppDelegate.swiftファイルを開き、以下の行をfunc application(application:, willFinishLaunchingWithOptions: function)に追加します。
警告
iOSおよびtvOSの場合、** didFinishLaunchingWithOptions **ではなく** willFinishLaunchingWithOptions **にコードを追加します。func application(_ application: UIApplication, willFinishLaunchingWithOptions launchOptions: [UIApplicationLaunchOptionsKey : Any]? = nil) -> Bool {
Pyze.initialize("PYZE_APP_KEY", withLogThrottling: .PyzelogLevelMinimal)
return true
}
func application(application: UIApplication, willFinishLaunchingWithOptions launchOptions: [NSObject : AnyObject]?) -> Bool {
    Pyze.initialize("PYZE_APP_KEY", withLogThrottling: .PyzelogLevelMinimal)
    return true
}
watchOS ExtensionDelegate.swiftファイルを開き、以下の行をfunc applicationDidFinishLaunching()関数に追加します。
watchOSの場合は、didFinishLaunchingWithOptionsにコードを追加します。
/// Swift (watchOS)
func applicationDidFinishLaunching() {
    Pyze.initialize("PYZE_APP_KEY",
        withLogThrottling: .PyzelogLevelMinimal)
}
警告
PYZE_APP_KEY を独自の appKey に置き換えたことを確認してください。
Objective-C
プロジェクト内で AppDelegate.m (iOS & tvOS) または ExtensionDelegate.m (watchOS) を開き、Pyze モジュールをインポートします。
#import <Pyze/Pyze.h>
iOSおよびtvOS - Appデリゲートコードファイルの@implementationブロックにあるapplication:willFinishLaunchingWithOptions:メソッドに以下の行を追加します。(通常は AppDelegate.m )。クラス内にアプリケーション:willFinishLaunchingWithOptions`:メソッドがない場合は、単純に追加してください。
警告
iOSおよびtvOSの場合、** didFinishLaunchingWithOptions **ではなく** willFinishLaunchingWithOptions **にコードを追加します。- (BOOL)application:(UIApplication*)application willFinishLaunchingWithOptions:(NSDictionary*)launchOptions {
[Pyze initialize:@"PYZE_APP_KEY"
withLogThrottling: PyzelogLevelMinimal]; //see https://growth.pyze.com
return YES;
}
watchOS - 拡張デリゲートコードファイルの @implementation ブロックの application:applicationDidFinishLaunching: メソッドに以下の行を追加します。(通常は ExtensionDelegate.m )。
// Objective C (watchOS)
- (void)applicationDidFinishLaunching {
    [Pyze initialize:@"PYZE_APP_KEY"
        withLogThrottling: PyzelogLevelMinimal];
}
警告
PYZE_APP_KEY を独自の appKey に置き換えたことを確認してください。
カスタムイベント
カスタム イベントを使用すると、アプリ内でのユニークなユーザー アクションを簡単に追跡することができます。
属性を持つイベント
これにより、ユーザーがいつアクションを実行したかを追跡することができ、そのイベントの発生頻度を簡単にカウントすることができます。 属性とは、イベントにアタッチできるキーと値のペアのことです。どのイベントでも最大99個の属性を持つことができます。ベスト・プラクティスを遵守し、アトリビュートに大きく依存して、インストルメンテーションを可能な限り最小限にし、有用なものにすることを強くお勧めします。典型的なアプリケーションでは、イベントよりも多くの属性を持つべきです。
[PyzeCustomEvent postWithEventName:@"My Blog Read Event"
    withAttributes:@{
        @"Author" : @"nav iosnavtabsS",
        @"User Status" : @"Registered",
        @"Article Source" : @"https://blog.pyze.com",
        @"Publish Time" : @"2015-12-17"}];

// Alternate way to pass value1,key1, value2,key2 ...
NSDictionary * attributes = [NSDictionary dictionaryWithObjectsAndKeys:
    @"nav iosnavtabsS", @"Author",
    @"Registered", @"User Status",
    @"blog.pyze.com", @"Article Source",
    @"2015-12-17", @"Publish Time",
    nil];
[PyzeCustomEvent postWithEventName:@"Blog Read" withAttributes:attributes];
PyzeCustomEvent.postWithEventName("Blog Read",
    withAttributes: ["Author": "nav iosnavtabsS", "User status":  "Registered",
    "Article Source": "CNN", "Publish Time": "12-17-2015"])

// Alternate way to pass value1,key1, value2,key2 ...
let attributes: [NSObject : AnyObject] = [
    "Author" : "nav iosnavtabsS",
    "User_Status" : "Registered",
    "CNN" : "Article Source",
    "12-17-2015" : "Publish Time"
]

PyzeCustomEvent.postWithEventName("Blog Read", withAttributes: attributes)
PyzeCustomEvent.post(withEventName: "Blog Read", withAttributes: ["Author": "nav iosnavtabsS", "User status":  "Registered", "Article Source": "CNN", "Publish Time": "12-17-2015"])

// Alternate way to pass value1,key1, value2,key2 ...
let attributes: [AnyHashable : Any] = [
    "Author" : "nav iosnavtabsS",
    "User_Status" : "Registered",
    "CNN" : "Article Source",
    "12-17-2015" : "Publish Time"
]

PyzeCustomEvent.post(withEventName: "Blog Read", withAttributes: attributes)
タイムドイベント
ユーザーがアクションを完了するまでにかかる時間を計ることは、Pyze の一般的な使用例です。SDkには、タイマーを開始し、アクションの完了時にカスタムイベントを送信できるようにすることで、これを処理する機能が組み込まれています。
startTimerForEvent- 名前を指定してタイマーを開始するpostTimedEvent- 同じ名前を参照してタイマーを終了します。ミリ秒単位の時間が自動的にこのイベントに添付されます。postTimedEventWithAttributes- 同じ名前を参照し、同様に任意の属性を添付してタイマーを終了します。ミリ秒単位の時間が自動的にこのイベントに添付されます。
//Start timer for event
[PyzeCustomEvent startTimerForEvent:@"Screen Load Time"];

//Post timed event.
//Note : The event name attribute for the `startTimerForEvent` and  `postTimedEvent` should match.
[PyzeCustomEvent postTimedEvent:@"Screen Load Time"];

//Post timed event with attributes
[PyzeCustomEvent postTimedEvent:@"Screen Load Time" withAttributes:@{
    @"device" : @"iPhone 6s",
    @"location" : @"CA"
}];
//Start timer for event
PyzeCustomEvent.startTimer(forEvent: "Screen Load Time")

//Post timed event.
//Note : The event name attribute for the `startTimerForEvent` and  `postTimedEvent` should match.
PyzeCustomEvent.postTimedEvent("Screen Load Time")

//Post timed event with attributes
PyzeCustomEvent.postTimedEvent(
    "Screen Load Time",
    withAttributes: [
        "device": "iPhone 6s",
        "location": "CA"
    ])
プロフィール
プロファイルは、Pyzeにユーザーに関するデータを追加するための強力な方法です。プロファイルを使用して、ある時点(イベント)に固有のデータではなく、特定のユーザーに関連付けられたデータを追加することができます。
ユーザーがアプリにログインしたら、setUserProfileを呼び出してPyzeにユーザーを識別します。ユーザーが識別された後に発生したイベントはすべて、このユーザーに帰属します。このメソッドは、セッションの最初のログイン時に一度だけ呼び出す必要があります。
オプションでプロファイル属性を含めることができます。
Pyzeの組み込みプロファイル属性はpyze UIで特別な扱いを受けますが、受信したデータに基づいてカスタム属性のデータ型を判別しようとします。ビルトイン属性とカスタム属性の間には、適用されるフォーマット以外の違いはありません。
//Create Pyze Profile Attributes object
//Create Custom Profile Attributes object
//Call the setUserProfile API
[PyzeIdentity setUserProfile:@"" pyzeProfileAttributes:@{
    @"email_id"        : @"xyz@abc.com",
    @"date_of_birth"   : @"1984-06-01",
    @"first_name"      : @"John",
    @"last_name"       : @"Jacobs"
} customProfileAttributes:@{
    @"age"       : @29,
    @"pincode"   : @"23200",
    @"city"      : @"XYZ"
}];
Pyzeのプロフィール属性
| Pyze ユーザープロファイル フィールド名 | データの種類/説明 |
|---|---|
| background | (文字列) ユーザーの背景、経歴または履歴データ |
| country | (文字列) 国コードは ISO-3166-1 alpha-2 規格で 送信する必要があります。 |
| current_location | (オブジェクト) フォーマッ ト。{“longitude”. -33.991894, “緯度”. 25.243732} |
| date_of_first_use | (ユーザーが最初にアプリを使用した日付) ISO 8601形式またはyyyy-MM-dd’T’HH:mm:ss.SSZ形式の文 字列。 |
| date_of_last_use | (ユーザーが最後にアプリを使用した日付) ISO 8601形式の文字列、またはyyyy-MM-dd’T’T’HH:mm:ss.SSZ形 式の文字列。 |
| date_of_birth | (生年月日) “YYYY-MM-DD"形式の文字列。 |
| email_id | (文字列) 電子メール ID |
| email_subscribe | 文字列) 使用可能な値 は、“opt_in”(メールメッセージの受信を明示的に承認)、“opt_out”(メールメッセージの受信を明示的に拒否)、“subscribed”(オプトインもオプトアウトもしていない)です。 |
| email_hard_bounced | ハードバウンスが発生した場合に自動的に更新されます (true またはfalse) |
| email_spam_reported | ユーザーがISP経由でメールをスパムとしてマークした場合、自動的に更新されます(trueまたはfalse) |
| facebook_id | (文字列) facebook ID |
| first_name | (文字列) ユーザのファーストネーム |
| gender | 文字列)「M」、「F」、「O」(その他)、「N」(該当しない)、「P」(言いたくない)、「U」(不明 |
| home_city | (文字列) ユーザーの出身地 |
| image_url | (文字列) ユーザーに関連付けられる画像の URL |
| language | (文字列) ISO-639-1 標準で送信する言語を要求します。 |
| last_name | (文字列) ユーザの姓 |
| marked_email_as_spam_at | (文字列) ユーザーの電子メールがスパムとしてマークされた日付。ISO 8601形式、またはyyyy-MM-dd’T’HH:mm:ss.SSSZ形式でなければなりません。 |
| phone | (文字列) 電話番号 |
| push_subscribe | (文字列) 利用可能な値 は、“opted_in”(明示的にプッシュ メッセージを受信するように登録され ている)、“unsubscribed”(明示的にプッシュメッセージをオプトアウトしている)、“subscribed”(オプトインもオプトアウトもしていない)です。 |
| push_tokens | app_id とトークン文字列を持つオブ ジェクトの配列。オプションで、この トークンが関連付けられているデバ イスの device_id を指定することがで きます。アプリ識別子、“token”. “abcd”, “device_id”. “optional_field_value”}]。device_id が 指定されていない場合は、ランダム に生成されます。 |
| time_zone | (文字列) タイムゾーンはIANAタイム ゾーンデータベース(例: “America/New_York “や “Eastern Time (US & Canada)")に従って送信 されなければなりません。有効な値 のみが尊重されます。 |
| twitter_id | (文字列)Twitter ID |
既存のユーザープロファイルの更新
既に設定されているユーザプロファイルの属性を更新するには、以下のAPIを使用します。
注意 : setUserProfileを呼び出す前にこのAPIを呼び出さないでください。
//Create Pyze Profile Attributes object
//Create Custom Profile Attributes object
//Call the updateUserProfile API
[PyzeIdentity updateUserProfile:@"" pyzeProfileAttributes:@{
    @"email_id"        : @"xyz@abc.com",
    @"date_of_birth"   : @"1984-06-01",
    @"first_name"      : @"John",
    @"last_name"       : @"Jacobs"
} customProfileAttributes:@{
    @"age"       : @29,
    @"pincode"   : @"23200",
    @"city"      : @"XYZ"
}];
ユーザーのログアウト
ユーザがログアウトした際にこの API を呼び出します。このコールの後に送信されるイベントには ID は付与されず、匿名のユーザに帰属します。
[PyzeIdentity resetUserProfile];
ユーザーのプライバシー
Pyzeは、エンドユーザーがデータ収集からオプトアウトしたり、ユーザーのデータを忘れるようにPyzeシステムに指示したりするためのAPIを提供しています。
setUserOptOut
エンドユーザーがデータ収集からオプトアウトできるようにします。オプトアウトはTrueかFalseかを切り替えることができます。
[Pyze setUserOptOut:true];
Pyze.setUserOptOut(true)
ユーザーデータの収集を再開するには、値を false に設定します。
削除ユーザー
エンドユーザがデータ収集からオプトアウトし、Pyzeシステム内のユーザを削除することができます。一度削除したユーザーは元に戻すことができませんので、確認することをお勧めします。
[Pyze deleteUser:true];
Pyze.deleteUser(true)
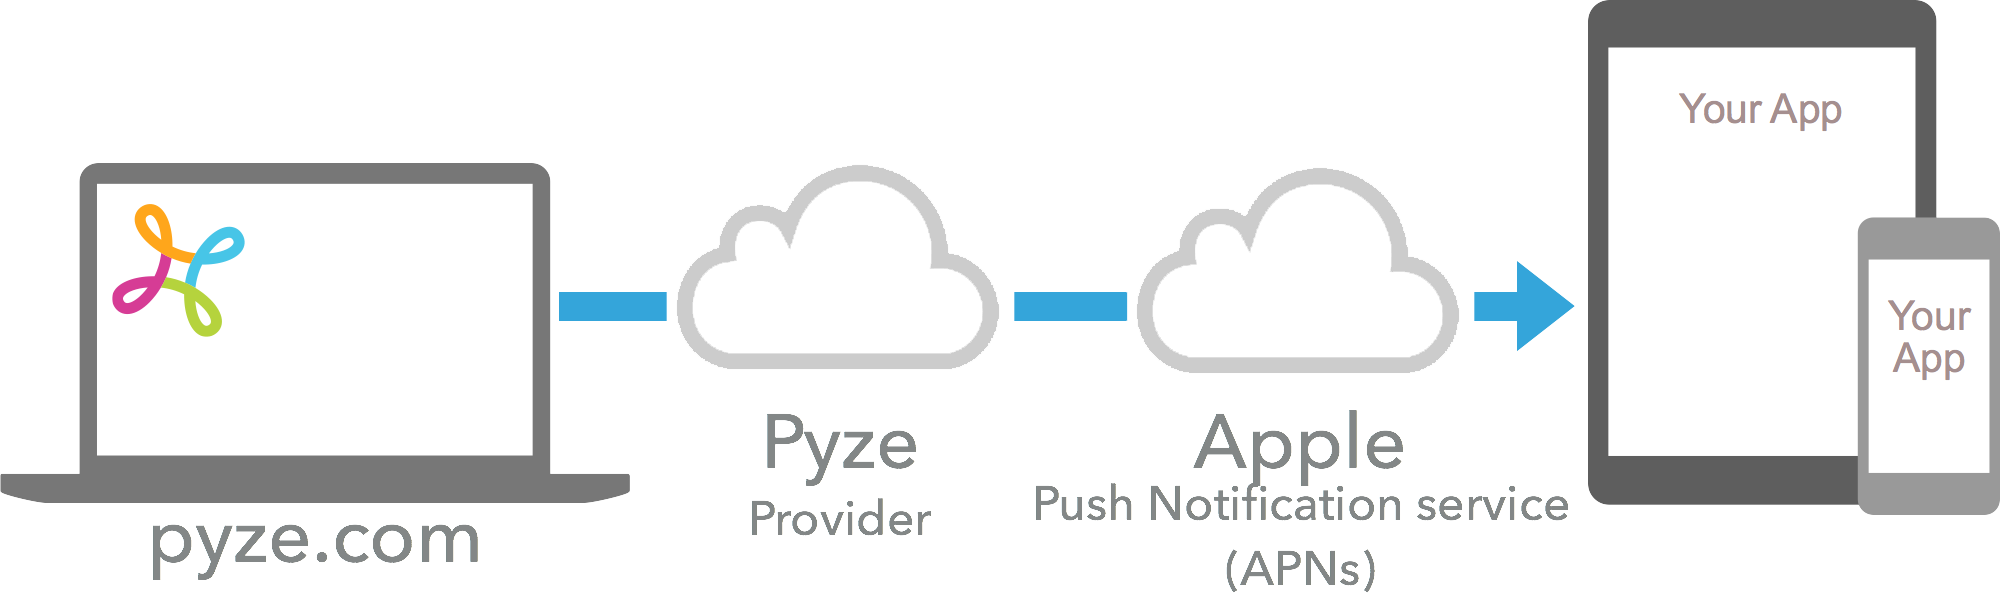
プッシュ通知
AppleはApple Push Notification Service(APNS)を提供しており、アプリパブリッシャーがプッシュ通知でユーザーにリーチできるようにしています。
1. P12 証明書の生成
- apple developerアカウントの
Certificates, Identifiers & Profilesページに移動します。 - 識別子」を選択し、「
YOUR_APP_IDENTIFIER」に移動します。 - 機能」で「プッシュ通知」を選択し、「設定」を選択します。
- 今すぐ開発/プロダクションSSL証明書の下で、証明書の作成を選択します。
- ここに記載されているように、証明書署名要求をアップロードします。https://help.apple.com/developer-account/#/devbfa00fef7)
- 生成された証明書をダウンロードして、
Keychain Accessに追加します。 - ここで、先ほどインポートした証明書を選択し、「エクスポート」を選択します。
- パスワードを入力し、
.p12を任意の場所に保存します。
2. プロバイダとしてPyzeを設定します。
アプリのユーザーに代わってPyzeがプッシュ通知を送信できるようにするには、iOSのプッシュ証明書をPyzeに提供してください。
- growth.pyze.comにログイン
- ナビゲーションペインの[設定]をクリックします。
- ドロップダウンリストから鍵を提供するアプリを選択します。
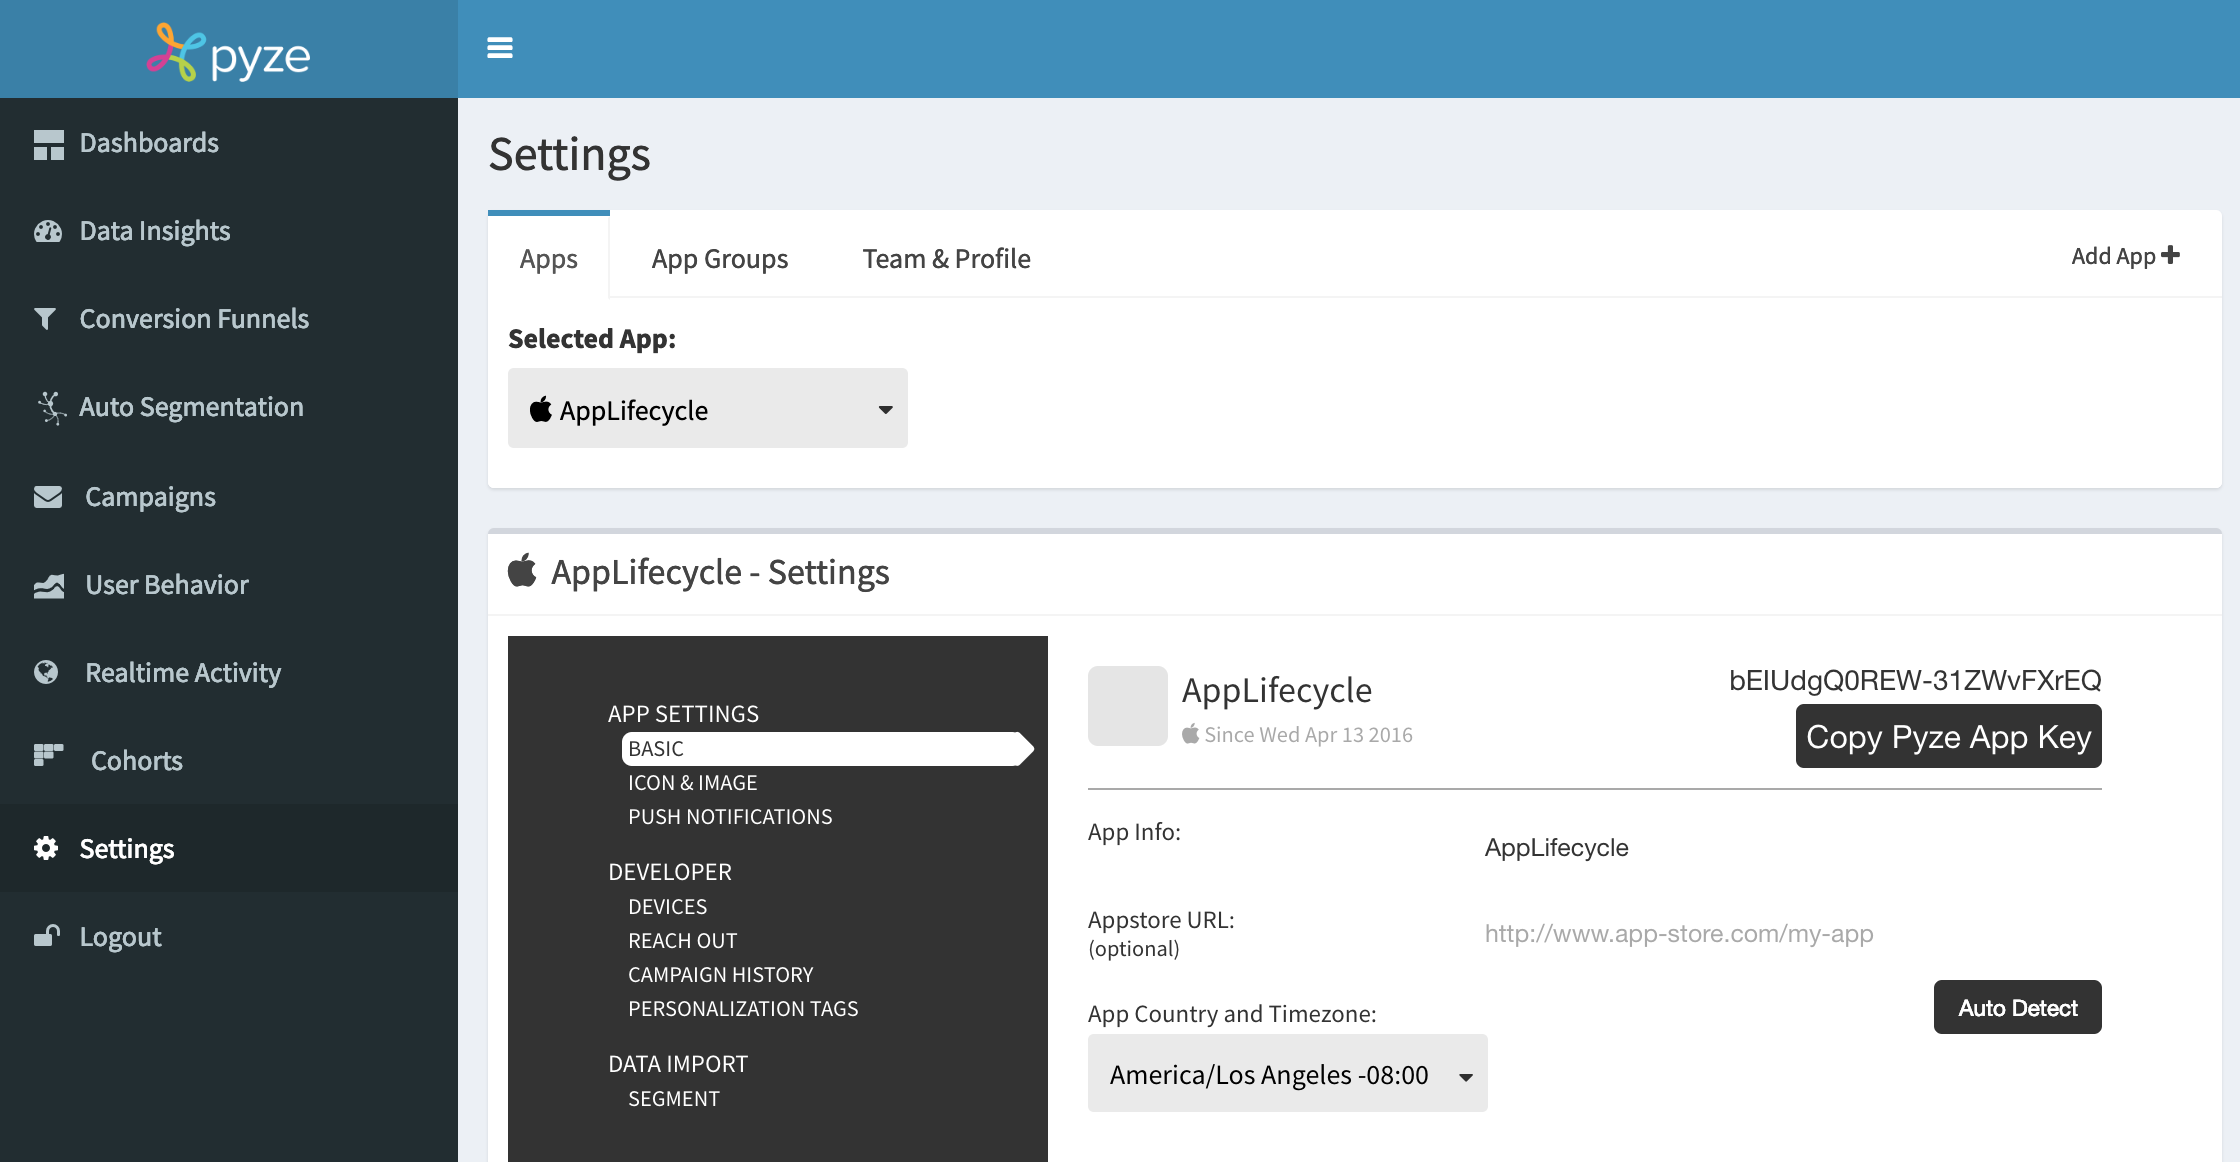
- 左メニューのプッシュ通知を選択します。
- .p12形式のPush通知証明書をアップロードし、p12パスワード(証明書作成時に生成したパスワード)を指定し、プロビジョニングモードを指定します。使用している証明書の種類に応じて、「開発」または「本番」を指定します。

- 1日と1週間のノルマ制限を選択
- 保存をクリックします。
3. プッシュ通知を有効にする
- アプリケーションターゲットの下にあるケイパビリティに移動し、ケイパビリティのPush NotificationsとBackground Modesを追加します。
- Background Modes]で[Remote notifications]にチェックを入れます。
4. AppDelegateの変更
AppDelegateを以下のように更新します。
@import Pyze;
#import <UserNotifications/UserNotifications.h>

@import CoreMotion;

//Let AppDelegate inherit UNUserNotificationCenterDelegate
@interface ALAppDelegate () <UNUserNotificationCenterDelegate>
@end

@implementation ALAppDelegate

//Initialize Pyze
- (BOOL)application:(UIApplication *)application willFinishLaunchingWithOptions:(NSDictionary *)launchOptions {
    [Pyze initialize:@"PYZE_APP_KEY" withLogThrottling: PyzelogLevelMinimal];
    return YES;
}

//Register for remote notification
- (BOOL)application:(UIApplication *)application didFinishLaunchingWithOptions:(NSDictionary *)launchOptions{
    [[UNUserNotificationCenter currentNotificationCenter] requestAuthorizationWithOptions:(UNAuthorizationOptionAlert +UNAuthorizationOptionSound) completionHandler:^(BOOL granted, NSError * _Nullable error) {}];
    [UNUserNotificationCenter currentNotificationCenter].delegate = self;
    [[UNUserNotificationCenter currentNotificationCenter] setNotificationCategories:[PyzeNotification getPyzeDefaultNotificationCategories]];
    [[UIApplication sharedApplication] registerForRemoteNotifications];
    [PyzeNotification initWithLaunchOptions:launchOptions];
    return YES;
}

//Set remote notification token to Pyze
- (void)application:(UIApplication *)application didRegisterForRemoteNotificationsWithDeviceToken:(NSData *)deviceToken {
    [Pyze setRemoteNotificationDeviceToken:deviceToken];
}

//Notify Pyze when push received.
- (void)application:(UIApplication *)application didReceiveRemoteNotification:(NSDictionary *)userInfo fetchCompletionHandler:(void (^)(UIBackgroundFetchResult))completionHandler{
    [Pyze processReceivedRemoteNotification:userInfo withState:[[UIApplication sharedApplication] applicationState] withCompletionHandler:completionHandler];
}

//Let pyze handle the remote notification action
-(void)userNotificationCenter:(UNUserNotificationCenter *)center didReceiveNotificationResponse:(UNNotificationResponse *)response withCompletionHandler:(void (^)(void))completionHandler{
    [PyzeNotification handlePushNotificationResponseWithUserinfo:response.notification.request.content.userInfo actionIdentifier:response.actionIdentifier];
    completionHandler();
}

//Enable app to view notification in foreground
-(void)userNotificationCenter:(UNUserNotificationCenter *)center willPresentNotification:(UNNotification *)notification withCompletionHandler:(void (^)(UNNotificationPresentationOptions))completionHandler {
    completionHandler(UNNotificationPresentationOptionAlert);
}

@end
import Pyze
import UserNotifications

//Let AppDelegate inherit UNUserNotificationCenterDelegate
@UIApplicationMain
class AppDelegate: UIResponder, UIApplicationDelegate, UNUserNotificationCenterDelegate {

    //Initialize Pyze
    func application(_ application: UIApplication, willFinishLaunchingWithOptions launchOptions: [UIApplication.LaunchOptionsKey : Any]? = nil) -> Bool {
        Pyze.initialize("PYZE_APP_KEY", withLogThrottling: .PyzelogLevelMinimal)
        return true
    }

    //Register for remote notification
    func application(_ application: UIApplication, didFinishLaunchingWithOptions launchOptions: [UIApplication.LaunchOptionsKey: Any]?) -> Bool {
        UNUserNotificationCenter.current().delegate = self;
        UNUserNotificationCenter.current().requestAuthorization(options:[.badge, .alert, .sound]) { granted, error in }
        UNUserNotificationCenter.current().setNotificationCategories(PyzeNotification.getPyzeDefaultNotificationCategories() as! Set<UNNotificationCategory>);
        UIApplication.shared.registerForRemoteNotifications();
        PyzeNotification.initWithLaunchOptions(launchOptions);
        return true
    }

    //Set remote notification token to Pyze
    func application(_ application: UIApplication, didRegisterForRemoteNotificationsWithDeviceToken deviceToken: Data) {
        Pyze.setRemoteNotificationDeviceToken(deviceToken);
    }

    //Notify Pyze when notification received
    func application(_ application: UIApplication, didReceiveRemoteNotification userInfo: [AnyHashable : Any], fetchCompletionHandler completionHandler: @escaping (UIBackgroundFetchResult) -> Void) {
        Pyze.processReceivedRemoteNotification(userInfo, with: application.applicationState, withCompletionHandler: completionHandler)
    }

    //Let pyze handle the remote notification action
    func userNotificationCenter(_ center: UNUserNotificationCenter, didReceive response: UNNotificationResponse, withCompletionHandler completionHandler: @escaping () -> Void) {
        PyzeNotification.handlePushResponse(withUserinfo: response.notification.request.content.userInfo, actionIdentifier: response.actionIdentifier)
        completionHandler()
    }

    //Enable app to view notification in foreground
    func userNotificationCenter(_ center: UNUserNotificationCenter, willPresent notification: UNNotification, withCompletionHandler completionHandler: @escaping (UNNotificationPresentationOptions) -> Void) {
        completionHandler(.alert);
    }
}
5. アプリのリッチプッシュ通知を有効にする
アプリがプッシュ通知メッセージ内で画像やGIFを受信できるようにします。
- ファイル] -> [新規作成] -> [ターゲット]に移動し、通知サービス拡張子を作成します。
- 製品名を入力し、必要な言語を選択します。
- プロジェクトとしてアプリケーションに埋め込むを選択してください。
- 上記の拡張機能を追加すると、XCodeはNotificationServiceクラスを作成します。その内容を以下のコードで置き換えてください。
#import "NotificationService.h"

@interface NotificationService ()

@property (nonatomic, strong) void (^contentHandler)(UNNotificationContent *contentToDeliver);
@property (nonatomic, strong) UNMutableNotificationContent *bestAttemptContent;

@end

@implementation NotificationService

- (NSURL *) attachmentFileURLWithTempLocation:(NSURL *)location name:(NSString *)fileName {
    NSFileManager *fileManager = [NSFileManager defaultManager];
    NSError *error;
    NSArray * domainDirectories = NSSearchPathForDirectoriesInDomains(NSDocumentDirectory, NSUserDomainMask, YES);
    NSString *documentsDirectory = [domainDirectories objectAtIndex:0];
    NSString *attachmentLocalFilePath = [documentsDirectory stringByAppendingPathComponent:@"/Pyze/"];
    if(![fileManager fileExistsAtPath:attachmentLocalFilePath]) [fileManager createDirectoryAtPath:attachmentLocalFilePath withIntermediateDirectories:NO attributes:nil error:&error];
    attachmentLocalFilePath =  [attachmentLocalFilePath stringByAppendingFormat:@"/%@",fileName];
    if([fileManager fileExistsAtPath:attachmentLocalFilePath]) {
        [fileManager removeItemAtPath:attachmentLocalFilePath error:&error];
        if (error) NSLog(@"Error in removing file : %@", error.debugDescription);
    }
    [fileManager moveItemAtPath:[location path] toPath:attachmentLocalFilePath error:&error];
    if (error) NSLog(@"Error in moving file to location : %@", error.debugDescription);
    NSURL *mediaFileURL = [NSURL fileURLWithPath:attachmentLocalFilePath];
    return mediaFileURL;
}

- (NSURLSessionDownloadTask *) loadAttachmentsWithURLString:(NSString *)urlString {
    NSURL *mediaURL = [NSURL URLWithString:urlString];
    NSURLSessionDownloadTask *task = [[NSURLSession sharedSession] downloadTaskWithURL:mediaURL completionHandler:^(NSURL * _Nullable location, NSURLResponse * _Nullable response, NSError * _Nullable error) {
          if (!error) {
              NSURL *mediaFileURL = [self attachmentFileURLWithTempLocation:location name:[response suggestedFilename]];
              UNNotificationAttachment *attachment = [UNNotificationAttachment attachmentWithIdentifier:[response suggestedFilename] URL:mediaFileURL options:nil error:&error];
              if (attachment) self.bestAttemptContent.attachments = @[attachment];
              self.contentHandler(self.bestAttemptContent);
          }
      }];
    return task;
}

#pragma mark - UNNotificationServiceExtension delegate

- (void)didReceiveNotificationRequest:(UNNotificationRequest *)request withContentHandler:(void (^)(UNNotificationContent * _Nonnull))contentHandler {
    self.contentHandler = contentHandler;
    self.bestAttemptContent = [request.content mutableCopy];
    self.bestAttemptContent.title = self.bestAttemptContent.title;
    self.bestAttemptContent.subtitle = self.bestAttemptContent.subtitle;
    NSString *mediaUrlString = request.content.userInfo[@"mediaUrl"];
    NSURLSessionDownloadTask *task = [self loadAttachmentsWithURLString:mediaUrlString];
    [task resume];
}

- (void)serviceExtensionTimeWillExpire {
    // Called just before the extension will be terminated by the system.
    // Use this as an opportunity to deliver your "best attempt" at modified content, otherwise the original push payload will be used.
    self.contentHandler(self.bestAttemptContent);
}

@end
import UserNotifications

class NotificationService: UNNotificationServiceExtension {

    var contentHandler: ((UNNotificationContent) -> Void)?
    var bestAttemptContent: UNMutableNotificationContent?

    override func didReceive(_ request: UNNotificationRequest, withContentHandler contentHandler: @escaping (UNNotificationContent) -> Void) {
        self.contentHandler = contentHandler
        bestAttemptContent = (request.content.mutableCopy() as? UNMutableNotificationContent)
        defer {
            contentHandler(bestAttemptContent ?? request.content)
        }
        guard let attachment = request.attachment else { return }
        bestAttemptContent?.attachments = [attachment]
    }

    override func serviceExtensionTimeWillExpire() {
        // Called just before the extension will be terminated by the system.
        // Use this as an opportunity to deliver your "best attempt" at modified content, otherwise the original push payload will be used.
        if let contentHandler = contentHandler, let bestAttemptContent =  bestAttemptContent {
            contentHandler(bestAttemptContent)
        }
    }
}

extension UNNotificationRequest {
    var attachment: UNNotificationAttachment? {
        guard let attachmentURL = content.userInfo["mediaUrl"] as? String, let imageData = try? Data(contentsOf: URL(string: attachmentURL)!) else {
            return nil
        }
        return try? UNNotificationAttachment(data: imageData, options: nil)
    }
}

extension UNNotificationAttachment {
    convenience init(data: Data, options: [NSObject: AnyObject]?) throws {
        let fileManager = FileManager.default
        let temporaryFolderName = ProcessInfo.processInfo.globallyUniqueString
        let temporaryFolderURL = URL(fileURLWithPath: NSTemporaryDirectory()).appendingPathComponent(temporaryFolderName, isDirectory: true)
        try fileManager.createDirectory(at: temporaryFolderURL, withIntermediateDirectories: true, attributes: nil)
        let imageFileIdentifier = UUID().uuidString + ".jpg"
        let fileURL = temporaryFolderURL.appendingPathComponent(imageFileIdentifier)
        try data.write(to: fileURL)
        try self.init(identifier: imageFileIdentifier, url: fileURL, options: options)
    }
}
アプリ内通知
アプリ内通知は、アプリを使用しているユーザーがアプリを使用した際に、アプリビジネスがユーザーに連絡を取ることを可能にします。アプリ内通知はpyze sdkに組み込まれており、追加の依存関係はありません。企業はDynamic FunnelsやIntelligence Explorerから手動で、Growth Automationからワークフローやキャンペーンに基づいて自動的にユーザーに連絡することができます。アプリ内通知は、新しいメッセージをチェックし、通知でモーダルをポップアップさせたい場所はどこでも、次のmethedを呼び出すCampaignsから送信することができます。
[Pyze showInAppNotification];
デバッグとロギング
ログレベルの設定
Initialize API は、オプションの 2 番目のパラメータでログレベルを設定することができます。デバッグログレベルを制御します。Pyze SDK のデフォルトのログレベルは Minimal です。
以下は、ログレベルのオプションです。
PyzelogLevelMinimal
PyzelogLevelWarnings
PyzelogLevelErrors
PyzelogLevelAll
トラブルシューティングガイド
1.欠落しているフレームワーク
Pyze フレームワークを手動でインストールし、フレームワーク CoreTelephony と SystemConfiguration を追加するのを忘れていた場合、以下のコンパイルエラーが発生します。
 "_CNCopyCurrentNetworkInfo", referenced from: ...
 "_CNCopySupportedInterfaces", referenced from: ...
 "_OBJC_CLASS_$_CTTelephonyNetworkInfo", referenced from: ...
 "_SCNetworkReachabilityCreateWithAddress", referenced from: ...
 "_SCNetworkReachabilityCreateWithName", referenced from: ...
 "_SCNetworkReachabilityScheduleWithRunLoop", referenced from: ...
 "_SCNetworkReachabilitySetCallback", referenced from: ...
 "_SCNetworkReachabilityUnscheduleFromRunLoop", referenced from: ...
解決方法。フレームワーク CoreTelephony と SystemConf``iguration の追加
2.CoreTelephonyフレームワークの欠落
CoreTelephonyフレームワークがない場合、以下のコンパイルエラーが発生します。
"_OBJC_CLASS_$_CTTelephonyNetworkInfo", referenced from: ...
"_CNCopySupportedInterfaces", referenced from: ...
解決方法。CoreTelephonyフレームワークの追加
- SystemConfiguration フレームワークの欠落
SystemConfigurationフレームワークがない場合、以下のコンパイルエラーが発生します。
"_SCNetworkReachabilityCreateWithAddress", referenced from: ...
"_SCNetworkReachabilityCreateWithName", referenced from: ...
"_SCNetworkReachabilityScheduleWithRunLoop", referenced from: ...
"_SCNetworkReachabilitySetCallback", referenced from: ...
"_SCNetworkReachabilityUnscheduleFromRunLoop", referenced from: ...
解決方法。SystemConfiguration フレームワークの追加
4.initializeWithKeyメソッドに渡された空のPyzeAppKeyを呼び出すと、以下のような例外が発生します。
*** Terminating app due to uncaught exception 'NSInternalInconsistencyException',
reason: 'PyzeAppKey needs to be set via initializeWithKey: method.
Log on to growth.pyze.com to get it.'
5.プロジェクトのビルド設定のLinkingのOther Linker FlagsにObjCの値を追加しなかった場合、画面フローは自動的にgrowth.pyze.comで更新されません。
解決方法は以下の通りです。ObjCフラグの追加
6.Cocoapodsを使用していて、.xcworkspaceではなく.xcodeprojを開いた場合、プロジェクトのコンパイル時に以下のようなエラーが表示されます。
*** ld: library not found for -lPods-Project_Name-ObjC
clang: error: linker command failed with exit code 1 (use -v to see invocation)
7.Cocoapodsの使用中に以下のエラーが発生した場合は、デプロイメントターゲットが8.0に設定されていることを確認してください。
Specs satisfying the `pyze-sdk-iOS` dependency were found, but they required a higher minimum deployment target.
8.下記のようにPyze SDKのインストールやアップデート中にcocoapodsでbuild spec validation errorが出る場合は、アプリ内のターゲットをiOS 8(iOS 7から)に変更するか、GitHubのフレームワーク版Pyzeを使用してください。フレームワークを使ったPyzeのインストールについてはこちらを参照してください。
ERROR | [iOS] dynamic: Dynamic frameworks and libraries are not supported on iOS 8.0 and onwards
9.下記のように実行中に「Image not found」エラーが出る場合は、プロジェクトのビルド設定のLinkingセクションのRunpath Search Pathsに@executable_path/Frameworksが追加されていることを確認してください。これは通常、Xcodeプロジェクトのバージョン5.xまたは6.xを作成した場合に発生します。
dyld: Library not loaded: @rpath/Pyze.framework/Pyze
Referenced from: <path_to_your_app>
Reason: image not found
10.致命的なエラー: lipo: can’t open input file: のようなエラーが発生した場合は、Xcodeプロジェクトのターゲット設定でBuild Active ArchitectureのみをYESに変更してください。
AppStoreの投稿
アプリをAppStoreに提出する前に(特にApplication Loader.appを介して)、シミュレータのバイナリを削除する必要があります。
- プロジェクトターゲットに移動します。
- ビルドフェーズに移動
- 新しい実行スクリプト」を追加するには、「+」をクリックします。
- 以下のスクリプトをコピーして貼り付けてください。
#**************************************************************************************

echo "Target architectures: $ARCHS"
APP_PATH="${TARGET_BUILD_DIR}/${WRAPPER_NAME}"

find "$APP_PATH" -name '*.framework' -type d | while read -r FRAMEWORK
do
FRAMEWORK_EXECUTABLE_NAME=$(defaults read "$FRAMEWORK/Info.plist" CFBundleExecutable)
FRAMEWORK_EXECUTABLE_PATH="$FRAMEWORK/$FRAMEWORK_EXECUTABLE_NAME"
echo "Executable is $FRAMEWORK_EXECUTABLE_PATH"
echo $(lipo -info "$FRAMEWORK_EXECUTABLE_PATH")

FRAMEWORK_TMP_PATH="$FRAMEWORK_EXECUTABLE_PATH-tmp"

# remove simulator's archs if location is not simulator's directory
case "${TARGET_BUILD_DIR}" in
*"iphonesimulator")
    echo "No need to remove archs"
    ;;
*)
    if $(lipo "$FRAMEWORK_EXECUTABLE_PATH" -verify_arch "i386") ; then
    lipo -output "$FRAMEWORK_TMP_PATH" -remove "i386" "$FRAMEWORK_EXECUTABLE_PATH"
    echo "i386 architecture removed"
    rm "$FRAMEWORK_EXECUTABLE_PATH"
    mv "$FRAMEWORK_TMP_PATH" "$FRAMEWORK_EXECUTABLE_PATH"
    fi
    if $(lipo "$FRAMEWORK_EXECUTABLE_PATH" -verify_arch "x86_64") ; then
    lipo -output "$FRAMEWORK_TMP_PATH" -remove "x86_64" "$FRAMEWORK_EXECUTABLE_PATH"
    echo "x86_64 architecture removed"
    rm "$FRAMEWORK_EXECUTABLE_PATH"
    mv "$FRAMEWORK_TMP_PATH" "$FRAMEWORK_EXECUTABLE_PATH"
    fi
    ;;
esac

echo "Completed for executable $FRAMEWORK_EXECUTABLE_PATH"
echo $(lipo -info "$FRAMEWORK_EXECUTABLE_PATH")

done
#**************************************************************************************