Android
Before starting your application instrumentation, ensure that you have created an app and have an appKey
Install
We recommend using Gradle or Maven when installing the Pyze SDK as it is the easiest and ensures you are using the latest stable version.
Add the Pyze Repository in the Project build.gradle file
In Android Studio, add the Pyze repository to all projects in the Project build.gradle file:
allprojects {
    repositories {
        jcenter()
        maven {
            url  "http://pyze.bintray.com/pyze-android"
        }
    }
}
Add the Pyze Dependency in the App build.gradle file
Add the pyze library compile statement under dependencies in the App build.gradle:
dependencies {
    compile 'com.pyze:PyzeLibrary:---Latest-Version---'
    // Usage example: compile 'com.pyze:PyzeLibrary:4.+'
}
The Pyze SDK Supports Android 4.03 and above. Ensure that your minSDKVersion is set to 15 or above
minSdkVersion 15
Ensure that the following Pemissions are specified in the AndroidManifest.xml:
<uses-permission android:name="android.permission.INTERNET" />
<uses-permission android:name="android.permission.ACCESS_NETWORK_STATE" />
<uses-permission android:name="android.permission.ACCESS_WIFI_STATE"/>
Initialize
Add the PyzeAppKey in the Application Tag in the AndroidManifest.xml:
<meta-data android:name="PyzeAppKey" android:value="PYZE_APP_KEY"/>
Warning
Make sure you replacedPYZE_APP_KEY with your own appKey
Import the pyze library in the Main Activity or Application file of the project.
import com.pyze.android.*;
Add the following Pyze.initialize statement in the Main Activity’s onCreate method or preferably add intiliaze call inside Application’s onCreate method.
public void onCreate(Bundle savedInstanceState) {
    ...
    Pyze.initialize(getApplication());
}
Custom Events
Custom events allow you to easily track unique user actions within your app.
Event
import com.pyze.android.PyzeEvents;
import java.util.HashMap;


PyzeEvents.postCustomEvent("Blog Read");
This allows you to track when a user executed an action, for a simple count of how often that event is occurring.
Event with Attributes
Attributes are any key-value pair that you can attach to an event. You can have up to 99 attributes with any event. It is highly recommended to follow our Best Practices and heavily rely on attributes to make your instrumentation as minimal and useful as possible. In a typical application, you should have many more attributes than events.
import com.pyze.android.PyzeEvents;
import java.util.HashMap;

// Create Hashmap with key value pairs of custom attributes and post with postCustomEventWithAttributes
HashMap <String, String> attributes = new HashMap<String, String>();
attributes.put("screen", "Home");
attributes.put("blog Id", 50);

PyzeEvents.postCustomEventWithAttributes("Blog Read", attributes);
Timed Events
Timing how long a user takes to complete an action is a common usecase for Pyze. The SDk has built-in handling for this, by allowing you to start a timer, and then send a custom event at the completion of that action.
startTimerForEvent- Start the timer with a namepostTimedEvent- End the timer by referencing the same name. The time in milliseconds will automatically be attached to this event.postTimedEventWithAttributes- End the timer by referencing the same name and attaching any attributes as well. The time in milliseconds will automatically be attached to this event.
import com.pyze.android.PyzeEvents;
import java.util.HashMap;

//Start timer for event
PyzeEvents.startTimerForEvent("Screen Load Time");

//Post timed event.
//Note : The event name attribute for the `startTimerForEvent` and  `postTimedEvent` should match.
PyzeEvents.postTimedEvent("Screen Load Time");

//Post timed event with attributes
HashMap <String, String> attributes = new HashMap<String, String>();
attributes.put("device", "Nokia 4.2");
attributes.put("location", "CA");
PyzeEvents.postTimedEvent("Screen Load Time", attributes);
Profile
Profiles are a powerful way to add data about your users to Pyze. Use profiles to add data that is not specific to a point in time (events) and are attached to a specific user.
When a user logs in to your app, call setUserProfile to identify them to Pyze. Any events that happen after they are identified, will be attributed to this user. You should only call this method once upon the initial login of a session.
You can optionally include profile attributes.
Pyze built-in profile attributes get special handling in the pyze UI, and we will attempt to discern the data type for custom attributes based on the data recieved. There is no difference between the built-in attributes and custom ones outside of formatting applied.
//Create Pyze Profile Attributes object
HashMap <String, String> pyzeProfileAttributes = new HashMap<String, String>();
pyzeProfileAttributes.put("email_id", "xyz@abc.com");
pyzeProfileAttributes.put("date_of_birth", "1984-06-01");
pyzeProfileAttributes.put("first_name", "John");
pyzeProfileAttributes.put("last_name", "Jacobs");

//Create Custom Profile Attributes object
HashMap <String, String> customProfileAttributes = new HashMap<String, String>();
customProfileAttributes.put("age", 29);
customProfileAttributes.put("picode", "23200");
customProfileAttributes.put("city", "XYZ");

//Call the setUserProfile API
PyzeIdentity.setUserProfile(userId,pyzeProfileAttributes,customProfileAttributes);
Pyze profile attributes
| Pyze User Profile Field Name | Data Type/Description |
|---|---|
| background | (string) User background, biography or historical data |
| country | (string) Country codes must be sent in the ISO-3166-1 alpha-2 standard. |
| current_location | (object) Format: {“longitude”: -33.991894, “latitude”: 25.243732} |
| date_of_first_use | (date at which the user first used the app) String in ISO 8601 format or in yyyy-MM-dd’T’HH:mm:ss.SSSZ format. |
| date_of_last_use | (date at which the user last used the app) String in ISO 8601 format or in yyyy-MM-dd’T’HH:mm:ss.SSSZ format. |
| date_of_birth | (date of birth) String in format “YYYY-MM-DD”, example: 1984-06-01. |
| email_id | (string) Email Id |
| email_subscribe | (string) Acceptable values are “opt_in” (explicit approval to receive email messages), “opt_out” (explicit denial to email messages), and “subscribed” (neither opted in nor out). |
| email_hard_bounced | Automatically updated when a hard bounce occurs (true or false) |
| email_spam_reported | Automatically updated when a user marks your email as spam, via the ISP (true or false) |
| facebook_id | facebook ID |
| first_name | (string) User’s First name |
| gender | (string) “M”, “F”, “O” (other), “N” (not applicable), “P” (prefer not to say) or “U” (unknown). |
| home_city | (string) User’s Home City |
| image_url | (string) URL of image to be associated with the user |
| language | (string) Require language to be sent in the ISO-639-1 standard. |
| last_name | (string) User’s Last Name |
| marked_email_as_spam_at | (string) Date at which the user’s email was marked as spam. Must be in ISO 8601 format or in yyyy-MM-dd’T’HH:mm:ss.SSSZ format. |
| phone | (string) Phone number |
| push_subscribe | (string) Available values are “opted_in” (explicitly registered to receive push messages), “unsubscribed” (explicitly opted out of push messages), and “subscribed” (neither opted in nor out). |
| push_tokens | Array of objects with app_id and token string. You may optionally provide a device_id for the device this token is associated with, e.g., [{“app_id”: App Identifier, “token”: “abcd”, “device_id”: “optional_field_value”}]. If a device_id is not provided, one will be randomly generated. |
| time_zone | (string) Time Zone’s must be sent as per IANA Time Zone Database (e.g., “America/New_York” or “Eastern Time (US & Canada)”). Only valid values will be respected. |
| twitter_id | Twitter ID |
Updating an existing user Profile
To update user profile attributes which are already set, use the following api.
Note : Do not call this api before calling setUserProfile.
//Create Pyze Profile Attributes object
HashMap <String, String> pyzeProfileAttributes = new HashMap<String, String>();
pyzeProfileAttributes.put("email_id", "xyz@abc.com");
pyzeProfileAttributes.put("date_of_birth", "1984-06-01");
pyzeProfileAttributes.put("first_name", "John");
pyzeProfileAttributes.put("last_name", "Jacobs");

//Create Custom Profile Attributes object
HashMap <String, String> customProfileAttributes = new HashMap<String, String>();
customProfileAttributes.put("age", 29);
customProfileAttributes.put("picode", "23200");
customProfileAttributes.put("city", "XYZ");
//Call the updateUserProfileAttributes API
PyzeIdentity.updateUserProfile(pyzeProfileAttributes,customProfileAttributes);
Logging out a user
Call this api when a user logs out. Event sent after this call will have no identity attached, and will be attributed to an anonymous user.
PyzeIdentity.resetUserProfile();
User Privacy
Pyze provides APIs to allow end-users to Opt out of Data Collection and also instruct the Pyze system to forget a user’s data.
setUserOptOut
Allows end-users to opt out from data collection. Opt-out can be toggled true or false.
Pyze.setUserOptOut(true)
To resume user data collection set value to false
deleteUser
Allows end-users to opt out from data collection and delete the user in the Pyze system. We recommend you confirm this action as once a user is deleted, this cannot be undone.
Pyze.deleteUser(true)
Push Notifications
Google provides the Firebase Cloud Messaging service (FCM) to allow app publishers to reach out to their users via push notifications.
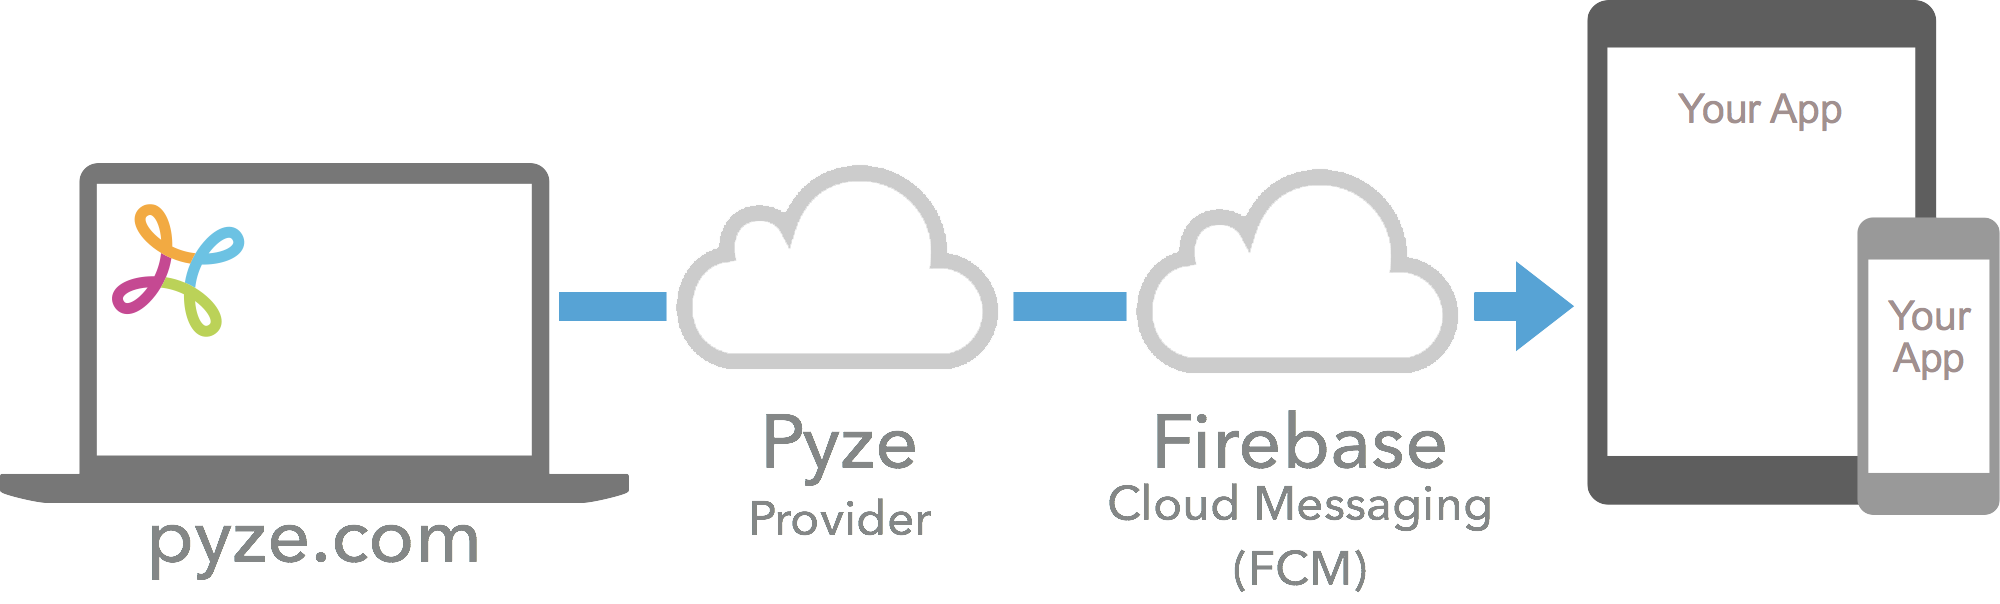
Set Firebase Credentials in pyze
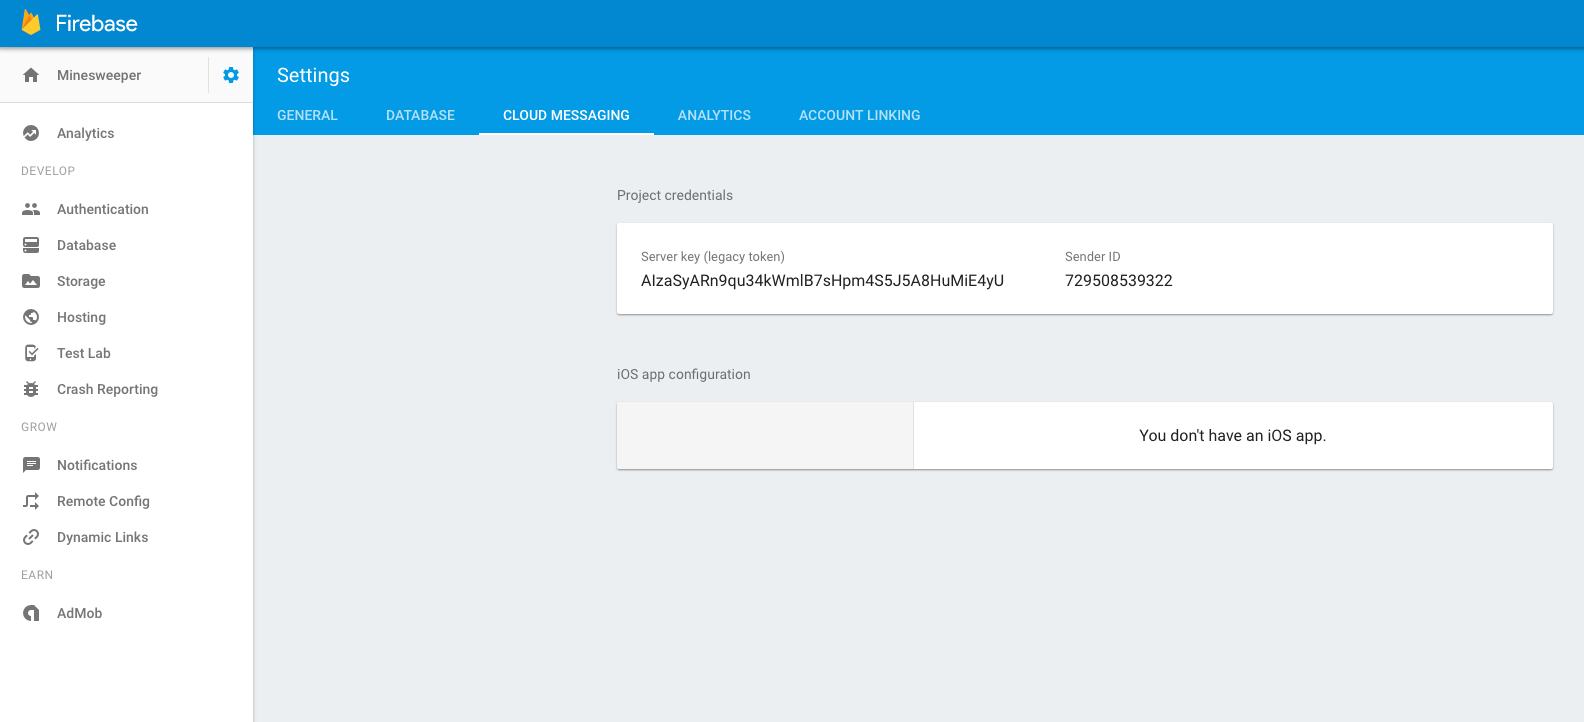
Login into your Firebase Console
- Select Your Project and Click on the Settings icon next to the Project name
- In the Cloud Messaging Tab, locate the Legacy Server Key and Sender ID
Login into your Pyze Account
- On the Settings page, select an app from the drop down menu.
- On the App Settings page, navigate to the Push Notifications settings from the left pane.
- Enter the Server key and Sender ID along with quota limits for the maximum number of push messages your app can send in a day and a week.

Integrate FCM Push Notifications in your App project
Add the following rules to your root-level build.gradle file, to include the google-services plugin:
buildscript {
    // ...
    dependencies {
        // ...
        classpath 'com.google.gms:google-services:---Latest-Version---'
    }
}
In your module Gradle file (usually the app/build.gradle), add the apply plugin line at the bottom of the file to enable the Gradle plugin:
apply plugin: 'com.android.application'

android {
    // ...
}

dependencies {
    // ...
}

// ADD THIS AT THE BOTTOM
apply plugin: 'com.google.gms.google-services'
Add the below dependency to your app’s build.gradle file:
dependencies {
    compile "com.google.firebase:firebase-messaging:---Latest-Version---"
}
The latest version can always be obtained from Bintray here
In the Android.Manifest file, add the below between the Application Tag:
<receiver android:name="com.pyze.android.push.PyzePushTrackingReceiver" android:exported="true"/>
<service
    android:name="com.pyze.android.push.fcm.FcmPushListenerService">
    <intent-filter>
        <action android:name="com.google.firebase.MESSAGING_EVENT" />
    </intent-filter>
</service>
Add google-services.json to your application
Custom Notification Image
To specify a custom notification icon image (app icon is used by default), place two icon images in your project’s drawable folder named pyze_notification_icon and pyze_notification_icon_transperent.
Optional Push Notification Handling options
The Pyze SDK handles the registration and display of basic and rich push messages by default, and the vast majority of the time this is all that is required. However, there may be cases where you may want to handle the registration of the Push Notifications yourself - for example to customize the display, or execute some action.
Use the built-in display
- Register for push received event
Pyze.registerForPushNotification(IPyzePushListener listener);
- Once a push message is received, call the following method to show the message
Pyze.showPushNotification(PyzePushMessage pushMessage);
- Usage
Pyze.registerForPushNotification(new IPyzePushListener() {
    @Override
    public void onPushNotificationReceived(PyzePushMessage pyzePushMessage) {
        //Perform some operation and then ask Pyze to display the notification
        Pyze.showPushNotification(pyzePushMessage);
    }
});
Use your own custom display
- Register for push received event
Pyze.registerForPushNotification(IPyzePushListener listener);
- Usage:
Pyze.registerForPushNotification(new IPyzePushListener() {
    @Override
    public void onPushNotificationReceived(PyzePushMessage pyzePushMessage) {
        //Perform internal app operation to your app eg: downloading content in the
        // background.
    }
});
Advanced Features
If you choose to handle the registration manually or you have your own implementation of FCM setup but you want to take advantage of Pyze push notifcation features, use the following methods to configure.
Pass the registration token to Pyze
@Override
public void onTokenRefresh() {
    super.onTokenRefresh();
    ...
    ...
    Pyze.setPushToken(FirebaseInstanceId.getInstance().getToken());
}
If the push message received is from Pyze, call the method below passing the push message. You can then either handle the message yourself as mentioned above in or allow Pyze to do it for you as follows.
@Override
public void onMessageReceived(RemoteMessage remoteMessage) {
    super.onMessageReceived(remoteMessage);
    if(remoteMessage.getData().get("pnty").equals("pyze")){
        PyzePushMessage message = new PyzePushMessage(remoteMessage.getData());
        //Handle displaying push notification manually or through Pyze
        Pyze.showPushNotification(message);
    }
}
In-App Notifications
In-app notifications allow app businesses to reach out to app users when they use your app. In-App notifications are built-in to the pyze sdk and have no additional dependecies.businesses to reach out to users from manually from Dynamic Funnels and Intelligence Explorer, and automatically based on workflows and campaigns from Growth Automation. In-App notifications can be sent from Campaigns Call the following methed, wherever you want to check for new messages and pop-up a modal with the notification:
Pyze.showInAppNotification(this); //`this` here is an activity context.
Attribution Tracking
Acquisition source attribution allows for app developers to understand the referring source to the Play Store for application installs.
The ref_id is a series of specific key / value pairs that must be included in the referring URL to Google Play. The keys you can use are
- Campaign Source (utm_source),
- Campaign Medium (utm_medium),
- Campaign Term (utm_term),
- Campaign Content (utm_content) and
- Campaign Name (utm_name).
- Campaign Source, Campaign Medium, and Campaign Name are required fields. You can build custom referral URLs using the URL form builder.
This is what a referring URL might look like:
http://play.google.com/details?id=your.package.name&utm_source=google&utm_medium=banner&utm_campaign=mycampaign
To enable install source tracking, add the following lines to the AndroidManifest.xml before the tag:
<receiver android:name="com.pyze.android.PlayRefReceiver" android:exported="true">
    <intent-filter>
        <action android:name="com.android.vending.INSTALL_REFERRER" />
    </intent-filter>
</receiver>
Debugging and Logging
Setting the log level
The Initialize API accepts an optional 2nd parameter to set the loglevel. To control the debug log level.
The Default log level for the Pyze SDK is Minimal.
Following are the logging level options you could use.
PyzelogLevelMinimal
PyzelogLevelWarnings
PyzelogLevelErrors
PyzelogLevelAll

Example: Pyze.initialize(getApplication(), "PyzelogLevelMinimal");
Multidex support
When multidex is enabled, create multidex-config.pro file and add the following line inside it -keep class com.pyze.android.** { *; }.
Update app/build.gradle as follows
android {
    buildTypes {
        release {
            multiDexKeepProguard file('multidex-config.pro')
            ...
        }
    }
}
More details can be found in the following link https://developer.android.com/studio/build/multidex#keep
API Reference
Full API reference available here