Appcelerator - ios
アプリケーションのインストルメンテーションを開始する前に、アプリを作成してappKeyがあることを確認してください。
インストール
tiapp.xmlを開き、modulesの下に次の行を追加します。
<module version="1.0.0" platform="iphone">ti.pyze<module>
初期化
- tiapp.xmlを開き、以下のようにpyze app keyを追加します。
    <ios>
      <plist>
         <dict>
           <key>PYZE_APP_KEY<key>
           <string><YOUR APP KEY><string>
         </dict>
      </plist>
    </ios>
警告
PYZE_APP_KEY を独自の appKey に置き換えたことを確認してください。
pyzeモジュールをインポートして、モジュールの参照を取得します。
var pyze = require('ti.pyze');
カスタムイベント
カスタムイベントでは、アプリ内でのユーザーのユニークなアクションを簡単に追跡することができます。
イベント
var pyze = require('ti.pyze');
pyze.postCustomEvent("customEventName")
これにより、ユーザーがいつアクションを実行したかを追跡し、そのイベントがどのくらいの頻度で発生しているかを簡単にカウントすることができます。
属性を持つイベント
属性とは、イベントにアタッチできるキーと値のペアのことです。どのイベントでも最大99個の属性を持つことができます。ベスト・プラクティスを遵守し、アトリビュートに大きく依存して、インストルメンテーションを可能な限り最小限にして有用にすることを強くお勧めします。典型的なアプリケーションでは、イベントよりも多くの属性を持つべきです。
var pyze = require('ti.pyze');
pyze.postCustomEventWithAttributes("customEventName", {"attrrKey1":"attrvalue1", "attrrKey2":"attrvalue2"}
タイムドイベント
ユーザーがアクションを完了するまでにかかる時間を計ることは、Pyze の一般的な使用例です。SDk には、タイマーを起動し、アクションの完了時にカスタムイベントを送信することができるようにすることで、これを処理する機能が組み込まれています。
var pyze = require('ti.pyze');
var timerRef = pyze.timerReference
pyze.postCustomEventWithAttributes("customEventName", timerRef, {"attrrKey1":"attrvalue1", "attrrKey2":"attrvalue2"})
ユーザーのプライバシー
Pyzeは、エンドユーザーがデータ収集からオプトアウトしたり、ユーザーのデータを忘れるようにPyzeシステムに指示したりするためのAPIを提供しています。
setUserOptOut
エンドユーザーがデータ収集からオプトアウトできるようにします。オプトアウトはTrueかFalseかを切り替えることができます。
pyze.setUserOptOut(true)
ユーザーデータの収集を再開するには、値を false に設定します。
削除ユーザー
エンドユーザがデータ収集からオプトアウトし、Pyzeシステム内のユーザを削除することができます。一度削除したユーザーは元に戻すことができませんので、確認することをお勧めします。
pyze.deleteUser(true)
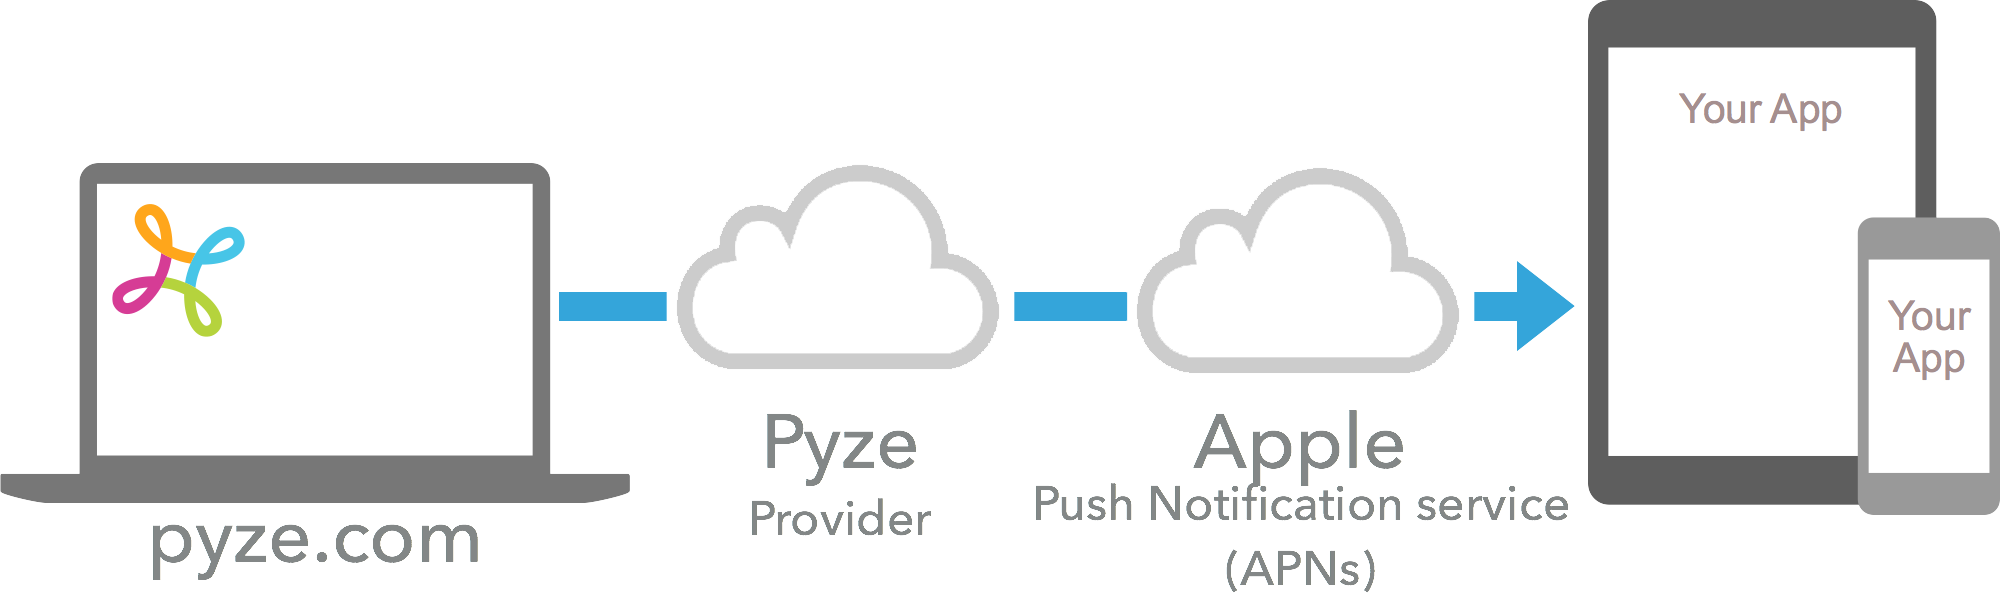
プッシュ通知
IOSのプッシュ通知
Apple provides the Apple Push Notification Service (APNS) to allow app publishers to reach out to their users via push notifications.
1. P12 証明書の生成
- apple developerアカウントの
Certificates, Identifiers & Profilesページに移動します。 - 識別子」を選択し、「
YOUR_APP_IDENTIFIER」に移動します。 - 機能」で「プッシュ通知」を選択し、「設定」を選択します。
- 今すぐ開発/プロダクションSSL証明書の下で、証明書の作成を選択します。
- ここに記載されているように、証明書署名要求をアップロードします。https://help.apple.com/developer-account/#/devbfa00fef7)
- 生成された証明書をダウンロードして、
Keychain Accessに追加します。 - ここで、先ほどインポートした証明書を選択し、「エクスポート」を選択します。
- パスワードを入力し、
.p12を任意の場所に保存します。
2. プロバイダとしてPyzeを設定する
アプリのユーザーに代わってPyzeがプッシュ通知を送信できるようにするには、iOSのプッシュ証明書をPyzeに提供してください。
- growth.pyze.comにログイン
- ナビゲーションペインの[設定]をクリックします。
- ドロップダウンリストから鍵を提供するアプリを選択します。

- 左メニューのプッシュ通知を選択します。
- .p12形式のPush通知証明書をアップロードし、p12パスワード(証明書作成時に生成したパスワード)を指定し、プロビジョニングモードを指定します。使用している証明書の種類に応じて、「開発」または「本番」を指定します。

- 1日と1週間のノルマ制限を選択
- 保存をクリックします。
3. プッシュ通知を有効にする
tiapp.xmlファイルを開き、以下の行を追加します。
<ios>
    <plist>
        <dict>
            <key>UIBackgroundModes</key>
            <array>
                <string>fetch</string>
                <string>remote-notification</string>
            </array>
        </dict>
    </plist>
</ios>
アプリのプッシュ通知を有効にする
先に進む前にiOS用のビルドを生成します。
リモート通知を有効にする
プッシュ通知についてはこちらのアプリセラレータガイドをご覧ください。
Ti.App.iOS.addEventListener('usernotificationsettings', function registerForPush() {
    Ti.App.iOS.removeEventListener('usernotificationsettings', registerForPush);
    Ti.Network.registerForPushNotifications({
        success: deviceTokenSuccess,
        error: deviceTokenError,
        callback: receivePush
    });
});
使用する通知タイプの登録
 Ti.App.iOS.registerUserNotificationSettings({
    types: [
        Ti.App.iOS.USER_NOTIFICATION_TYPE_ALERT,
        Ti.App.iOS.USER_NOTIFICATION_TYPE_SOUND,
        Ti.App.iOS.USER_NOTIFICATION_TYPE_BADGE
    ]
});
Pyze に APNS デバイストークンを知らせる
以下のコードを追加します。
function deviceTokenSuccess(e) {
    deviceToken = e.deviceToken;

	var pyze = require('ti.pyze');
    pyze.setRemoteNotificationDeviceToken(deviceToken);
}
リモート通知をPyzeに処理させる
以下のコードを追加します。
function receivePush(e) {
	 Ti.API.info('receivePush `'+JSON.stringify(e)+'`:');

	// alert('Received push: ' + JSON.stringify(e));
	 pyze.processReceivedRemoteNotification(e)
 }
インタラクティブな通知
[appceleratorのインタラクティブな通知ガイドはこちら]](https://docs.appcelerator.com/platform/latest/#!/guide/iOS_Interactive_Notifications)
Pyze は、インタラクティブな通知を表示するために、事前に定義されたプッシュ通知カテゴリのセットを提供しています。以下にカテゴリとそれぞれのアクションのリストを示します。
Yes or No (opens the app)
Category Id : pyze_bool_foreground
Actions:
1.	Title:  Yes
    Action Id: yes
    Foreground: true
    Authentication Required: true

2.	Title:  No
    Action Id: no
    Foreground: false
    Authentication Required: true
Yes or No (dismiss notification)
Category Id : pyze_bool_background
Actions:
1.	Title:  Yes
     Action Id: yes
     Foreground: true
     Authentication Required: true

2.	Title:  No
    Action Id: no
    Foreground: false
    Authentication Required: true
Accept or Decline (opens the app)
Category Id : pyze_accept_action_foreground
Actions:
1.	Title:  Accept
    Action Id: accept
    Foreground: true
    Authentication Required: true

2.	Title:  Decline
    Action Id: decline
    Foreground: false
    Authentication Required: true
Accept or Decline (dismiss notification)
Category Id : pyze_accept_action_background
Actions:
1.	Title:  Accept
    Action Id: accept
    Foreground: false
    Authentication Required: true

2.	Title:  Decline
    Action Id: decline
    Foreground: false
    Authentication Required: true
Shop Now
Category Id : pyze_shop_now
Actions:
1.	Title:  Shop Now
    Action Id: shop_now
    Foreground: true
    Authentication Required: true
Buy Now
Category Id : pyze_buy_now
Actions:
1.	Title:  Buy Now
    Action Id: buy_now
    Foreground: true
    Authentication Required: true
Follow
Category Id : pyze_buy_now
Actions:
1.	Title:  Follow
    Action Id: follow
    Foreground: false
    Authentication Required: true
Opt-In
Category Id : pyze_opt_in
Actions:
1.	Title:  Opt-In
    Action Id: opt_in
    Foreground: false
    Authentication Required: true
Unfollow
Category Id : pyze_unfollow
Actions:
1.	Title:  Unfollow
    Action Id: unfollow
    Foreground: false
    Authentication Required: true
Opt-out
Category Id : pyze_opt_out
Actions:
1.	Title:  Opt-out
    Action Id: opt_out
    Foreground: false
    Authentication Required: true
Remind Me Later
Category Id : pyze_remind_me_later
Actions:
1.	Title:  Remind Me Later
    Action Id: opt_out
    Foreground: false
    Authentication Required: true
Download
Category Id : pyze_download
Actions:
1.	Title:  Download
    Action Id: download
    Foreground: true
    Authentication Required: true
Share
Category Id : pyze_share
Actions:
1.	Title:  Share
    Action Id: share
    Foreground: true
    Authentication Required: true
Download / Share
Category Id : pyze_download_share
Actions:
1.	Title:  Download
    Action Id: download
    Foreground: true
    Authentication Required: true

2.	Title:  Share
    Action Id: share
    Foreground: true
    Authentication Required: true
Remind Me Later / Share
Category Id : pyze_remind_share
Actions:
1.	Title:  Remind Me Later
    Action Id: remind
    Foreground: false
    Authentication Required: true

2.	Title:  Share
    Action Id: share
    Foreground: true
    Authentication Required: true
通知カテゴリの定義
例 カテゴリ、承認または拒否(アプリを開く)は以下のように定義できます。
var acceptAction = Ti.App.iOS.createUserNotificationAction({
    identifier: “accept”,
    title: “Accept”,
    activationMode: Ti.App.iOS.USER_NOTIFICATION_ACTIVATION_MODE_FOREGROUND,
    destructive: false,
    authenticationRequired: true
});
var rejectAction = Ti.App.iOS.createUserNotificationAction({
    identifier: “decline”,
    title: “Decline”,
    activationMode: Ti.App.iOS.USER_NOTIFICATION_ACTIVATION_MODE_BACKGROUND,
    destructive: true,
    authenticationRequired: true
});
var acceptDeclineCategory = Ti.App.iOS.createUserNotificationCategory({
    identifier: "pyze_accept_action_foreground",
    actionsForDefaultContext: [acceptAction, rejectAction],
    actionsForMinimalContext: [acceptAction, rejectAction]
});
通知タイプと同様に、以下のようにTitanium.App.iOS.registerUserNotificationSettings()を使用して、定義された通知カテゴリを登録します。
Ti.App.iOS.registerUserNotificationSettings({
    types: [
        Ti.App.iOS.USER_NOTIFICATION_TYPE_ALERT,
        Ti.App.iOS.USER_NOTIFICATION_TYPE_SOUND,
        Ti.App.iOS.USER_NOTIFICATION_TYPE_BADGE
    ],
    categories: [acceptDeclineCategory]
});
インタラクティブな通知を監視する
受信した通知を処理し、選択されたプッシュアクションを実行させます。
Ti.App.iOS.addEventListener('remotenotificationaction', function(e) {
    Ti.API.info('remotenotificationaction `'+JSON.stringify(e)+'`:');
        pyze.handlePushNotificationAction(e.identifier, e);
    });
}
リッチな通知
.xcodeprojを開き、以下のリンクの指示に従ってください-リッチプッシュ通知を統合するために
アプリ内通知
アプリ内通知は、アプリを使用しているユーザーがアプリを使用した際に、アプリビジネスがユーザーに連絡を取ることを可能にします。
アプリ内通知はpyze sdkに組み込まれており、追加の依存関係はありません。企業は、Dynamic FunnelsやIntelligence Explorerから手動で、Growth Automationからワークフローやキャンペーンに基づいて自動的にユーザーに連絡することができます。
アプリ内通知は、キャンペーンから送信することができます。
新しいメッセージをチェックして、通知のあるモーダルをポップアップさせたい場合はどこでも、以下のメソッドを呼び出します。
void showInAppNotificationUIForDisplayMessagesWithCustomAttributes(messageType, buttonTextcolor, buttonBackgroundColor, backgroundColor, messageCounterTextColor, callback);
使用方法
var pyze = require('ti.pyze');
    pyze.showInAppNotificationUIForDisplayMessagesWithCustomAttributes(0, "#ffffff", "#ffffff", "#ffffff", "#ffffff", function(params){
    var status = params[0]
    Ti.API.info('InAppStatus  `'+params[0]+'`:');
    });
デバッグとロギング
プラットフォーム固有の情報は ios のドキュメントを参照してください。