Apache Cordova
アプリケーションのインストルメンテーションを開始する前に、アプリを作成してappKeyがあることを確認してください。
インストール
プロジェクトディレクトリ内で以下のコマンドを実行します。
cordova plugin add pyze-cordova --variable ANDROID_PAK=ANDROID_PYZE_APP_KEY --variable IOS_PAK=iOS_PYZE_APP_KEY
初期化
ANDROID_PYZE_APP_KEYの更新 platforms/androidフォルダにあるconfig.xmlとAndroidManifest.xml内のPYZE_APP_KEYを更新します。
iOS_PYZE_APP_KEYの更新 platforms/ios/PROJECT_NAME/フォルダにあるconfig.xmlとPROJECT_NAME-info.plist内のPYZE_APP_KEYを更新します。
インストールコマンドを実行すると、アプリケーションも初期化されます。
Pyze Apache Cordova App SDK. アイオニックサポート
1.ionic cordova plugin add pyze-cordova --variable ANDROID_PAK=ANDROID_PYZE_APP_KEY --variable IOS_PAK=iOS_PYZE_APP_KEY IonicプラットフォームにPyze SDKをインストールして初期化します。
2.ionicの場合は、pyze.cordovaではなく、window.pyze.cordovaネームスペースを使ってPyze SDKのAPIにアクセスする必要があります。
カスタムイベント
カスタムイベントでは、アプリ内でのユーザーのユニークなアクションを簡単に追跡することができます。
詳細なイベントの概要については、api & events.を参照してください。
イベント
pyze.cordova.PyzeEvents.postCustomEvent("Event Name");
これにより、ユーザーがいつアクションを実行したかを追跡し、そのイベントがどれくらいの頻度で発生しているかを簡単にカウントすることができます。
属性を持つイベント
属性とは、イベントにアタッチできるキーと値のペアのことです。どのイベントでも最大99個のアトリビュートを持つことができます。インストルメンテーションを可能な限り最小限にして有用なものにするためには、弊社のベストプラクティスに従うことを強くお勧めします。一般的なアプリケーションでは、イベントよりも多くの属性を持つべきです。
var customAttribute = {};
customAttribute.color = "Red";
pyze.cordova.PyzeEvents.postCustomEventWithAttributes("Event Name",customAttribute);
タイムドイベント
ユーザーがアクションを完了するまでにかかる時間を計ることは、Pyze の一般的な使用例です。SDkには、タイマーを開始し、アクションの完了時にカスタムイベントを送信できるようにすることで、これを処理する機能が組み込まれています。
startTimerForEvent- 名前を指定してタイマーを開始するpostTimedEvent- 同じ名前を参照してタイマーを終了します。ミリ秒単位の時間が自動的にこのイベントに添付されます。postTimedEventWithAttributes- 同じ名前を参照し、同様に任意の属性を添付してタイマーを終了します。ミリ秒単位の時間が自動的にこのイベントに添付されます。
//Start timer for event
pyze.cordova.PyzeEvents.startTimerForEvent("Screen Load Time");

//Post timed event.
//Note : The event name attribute for the `startTimerForEvent` and  `postTimedEvent` should match.
pyze.cordova.PyzeEvents.postTimedEvent("Screen Load Time");

//Post timed event with attributes
var customAttributes = {};
customAttributes["device"] = "Nokia 4.2";
customAttributes["location"] = "CA";
pyze.cordova.PyzeEvents.postTimedEventWithAttributes("Screen Load Time", customAttributes);
Profile
プロファイルは、Pyzeにユーザーに関するデータを追加するための強力な方法です。プロファイルを使用して、ある時点(イベント)に固有のデータではなく、特定のユーザーに関連付けられたデータを追加することができます。
ユーザーがアプリにログインしたら、setUserProfileを呼び出してPyzeにユーザーを識別します。ユーザーが識別された後に発生したイベントはすべて、このユーザーに帰属します。このメソッドは、セッションの最初のログイン時に一度だけ呼び出す必要があります。
オプションでプロファイル属性を含めることができます。
Pyzeの組み込みプロファイル属性はpyze UIで特別な扱いを受けますが、受信したデータに基づいてカスタム属性のデータ型を判別しようとします。ビルトイン属性とカスタム属性の間には、適用されるフォーマット以外の違いはありません。
//Create Pyze Profile Attributes object
var pyzeProfileAttributes = {
   "email_id"        : "xyz@abc.com",
   "date_of_birth"   : "1984-06-01",
   "first_name"      : "John",
   "last_name"       : "Jacobs"
}
//Create Custom Profile Attributes object
var customProfileAttributes = {
   "age"       : 29,
   "pincode"   : "23200",
   "city"      : "XYZ"
}
//Call the setUserProfile API
pyze.cordova.PyzeIdentity.setUserProfile(userId,pyzeProfileAttributes,customProfileAttributes);
Pyzeのプロフィール属性
| Pyze ユーザープロファイル フィールド名 | データの種類/説明 |
|---|---|
| background | (文字列) ユーザーの背景、経歴または履歴データ |
| country | (文字列) 国コードは ISO-3166-1 alpha-2 規格で 送信する必要があります。 |
| current_location | (オブジェクト) フォーマッ ト。{“longitude”. -33.991894, “緯度”. 25.243732} |
| date_of_first_use | (ユーザーが最初にアプリを使用した日付) ISO 8601形式またはyyyy-MM-dd’T’HH:mm:ss.SSZ形式の文 字列。 |
| date_of_last_use | (ユーザーが最後にアプリを使用した日付) ISO 8601形式の文字列、またはyyyy-MM-dd’T’T’HH:mm:ss.SSZ形 式の文字列。 |
| date_of_birth | (生年月日) “YYYY-MM-DD"形式の文字列。 |
| email_id | (文字列) 電子メール ID |
| email_subscribe | 文字列) 使用可能な値 は、“opt_in”(メールメッセージの受信を明示的に承認)、“opt_out”(メールメッセージの受信を明示的に拒否)、“subscribed”(オプトインもオプトアウトもしていない)です。 |
| email_hard_bounced | ハードバウンスが発生した場合に自動的に更新されます (true またはfalse) |
| email_spam_reported | ユーザーがISP経由でメールをスパムとしてマークした場合、自動的に更新されます(trueまたはfalse) |
| facebook_id | (文字列) facebook ID |
| first_name | (文字列) ユーザのファーストネーム |
| gender | 文字列)「M」、「F」、「O」(その他)、「N」(該当しない)、「P」(言いたくない)、「U」(不明 |
| home_city | (文字列) ユーザーの出身地 |
| image_url | (文字列) ユーザーに関連付けられる画像の URL |
| language | (文字列) ISO-639-1 標準で送信する言語を要求します。 |
| last_name | (文字列) ユーザの姓 |
| marked_email_as_spam_at | (文字列) ユーザーの電子メールがスパムとしてマークされた日付。ISO 8601形式、またはyyyy-MM-dd’T’HH:mm:ss.SSSZ形式でなければなりません。 |
| phone | (文字列) 電話番号 |
| push_subscribe | (文字列) 利用可能な値 は、“opted_in”(明示的にプッシュ メッセージを受信するように登録され ている)、“unsubscribed”(明示的にプッシュメッセージをオプトアウトしている)、“subscribed”(オプトインもオプトアウトもしていない)です。 |
| push_tokens | app_id とトークン文字列を持つオブ ジェクトの配列。オプションで、この トークンが関連付けられているデバ イスの device_id を指定することがで きます。アプリ識別子、“token”. “abcd”, “device_id”. “optional_field_value”}]。device_id が 指定されていない場合は、ランダム に生成されます。 |
| time_zone | (文字列) タイムゾーンはIANAタイム ゾーンデータベース(例: “America/New_York “や “Eastern Time (US & Canada)")に従って送信 されなければなりません。有効な値 のみが尊重されます。 |
| twitter_id | (文字列)Twitter ID |
既存のユーザープロファイルの更新
既に設定されているユーザプロファイルの属性を更新するには、以下のAPIを使用します。
注意 : setUserProfileを呼び出す前にこのAPIを呼び出さないでください。
//Create Pyze Profile Attributes object
var pyzeProfileAttributes = {
   "email_id"        : "xyz2@abc.com",
   "date_of_birth"   : "1984-07-01",
   "first_name"      : "John M",
   "last_name"       : "Jacobs"
}
//Create Custom Profile Attributes object
var customProfileAttributes = {
   "age"       : 29,
   "pincode"   : "232001",
   "city"      : "XYZ2"
}
//Call the updateUserProfileAttributes API
pyze.cordova.PyzeIdentity.updateUserProfile(pyzeProfileAttributes,customProfileAttributes);
ユーザーのログアウト
ユーザがログアウトした際にこの API を呼び出します。このコールの後に送信されるイベントには ID は付与されず、匿名のユーザに帰属します。
pyze.cordova.PyzeIdentity.resetUserProfile();
ユーザーのプライバシー
Pyzeは、エンドユーザーがデータ収集からオプトアウトしたり、ユーザーのデータを忘れるようにPyzeシステムに指示したりするためのAPIを提供しています。
setUserOptOut
エンドユーザーがデータ収集からオプトアウトできるようにします。オプトアウトはTrueかFalseかを切り替えることができます。
pyze.cordova..setUserOptOut(true)
ユーザーデータの収集を再開するには、値を false に設定します。
削除ユーザー
エンドユーザがデータ収集からオプトアウトし、Pyzeシステム内のユーザを削除することができます。一度削除したユーザーは元に戻すことができませんので、確認することをお勧めします。
pyze.cordova..deleteUser(true)
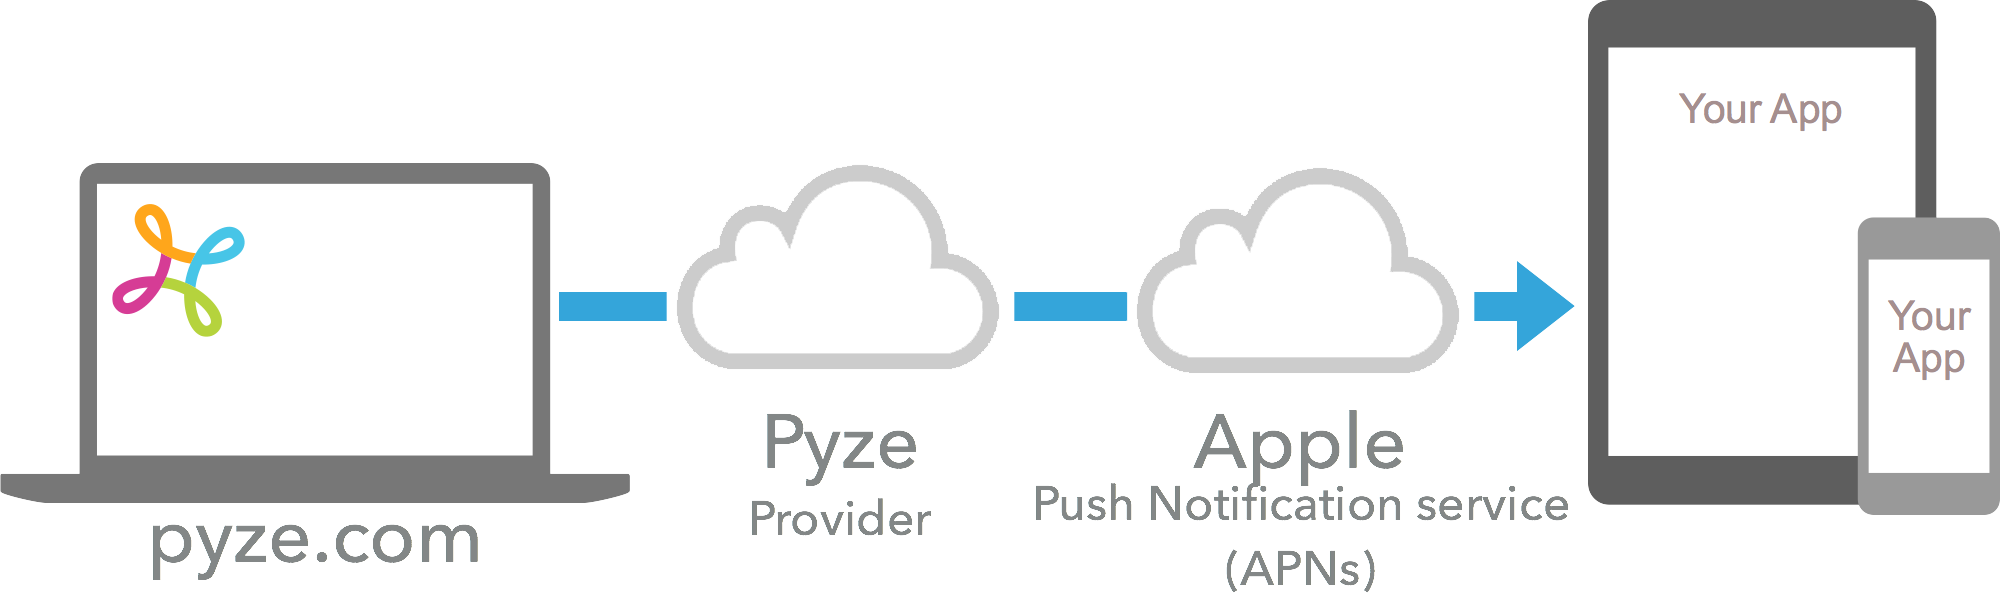
IOS プッシュ通知
AppleはApple Push Notification Service(APNS)を提供しており、アプリパブリッシャーがプッシュ通知でユーザーにリーチできるようにしています。
1. P12 証明書の生成
- apple developerアカウントの
Certificates, Identifiers & Profilesページに移動します。 - 識別子」を選択し、「
YOUR_APP_IDENTIFIER」に移動します。 - 機能」で「プッシュ通知」を選択し、「設定」を選択します。
- 今すぐ開発/プロダクションSSL証明書の下で、証明書の作成を選択します。
- ここに記載されているように、証明書署名要求をアップロードします。https://help.apple.com/developer-account/#/devbfa00fef7)
- 生成された証明書をダウンロードして、
Keychain Accessに追加します。 - ここで、先ほどインポートした証明書を選択し、「エクスポート」を選択します。
- パスワードを入力し、
.p12を任意の場所に保存します。
2. プロバイダとしてPyzeを設定する
アプリのユーザーに代わってPyzeがプッシュ通知を送信できるようにするには、iOSのプッシュ証明書をPyzeに提供してください。
- growth.pyze.comにログイン
- ナビゲーションペインの[設定]をクリックします。
- ドロップダウンリストから鍵を提供するアプリを選択します。
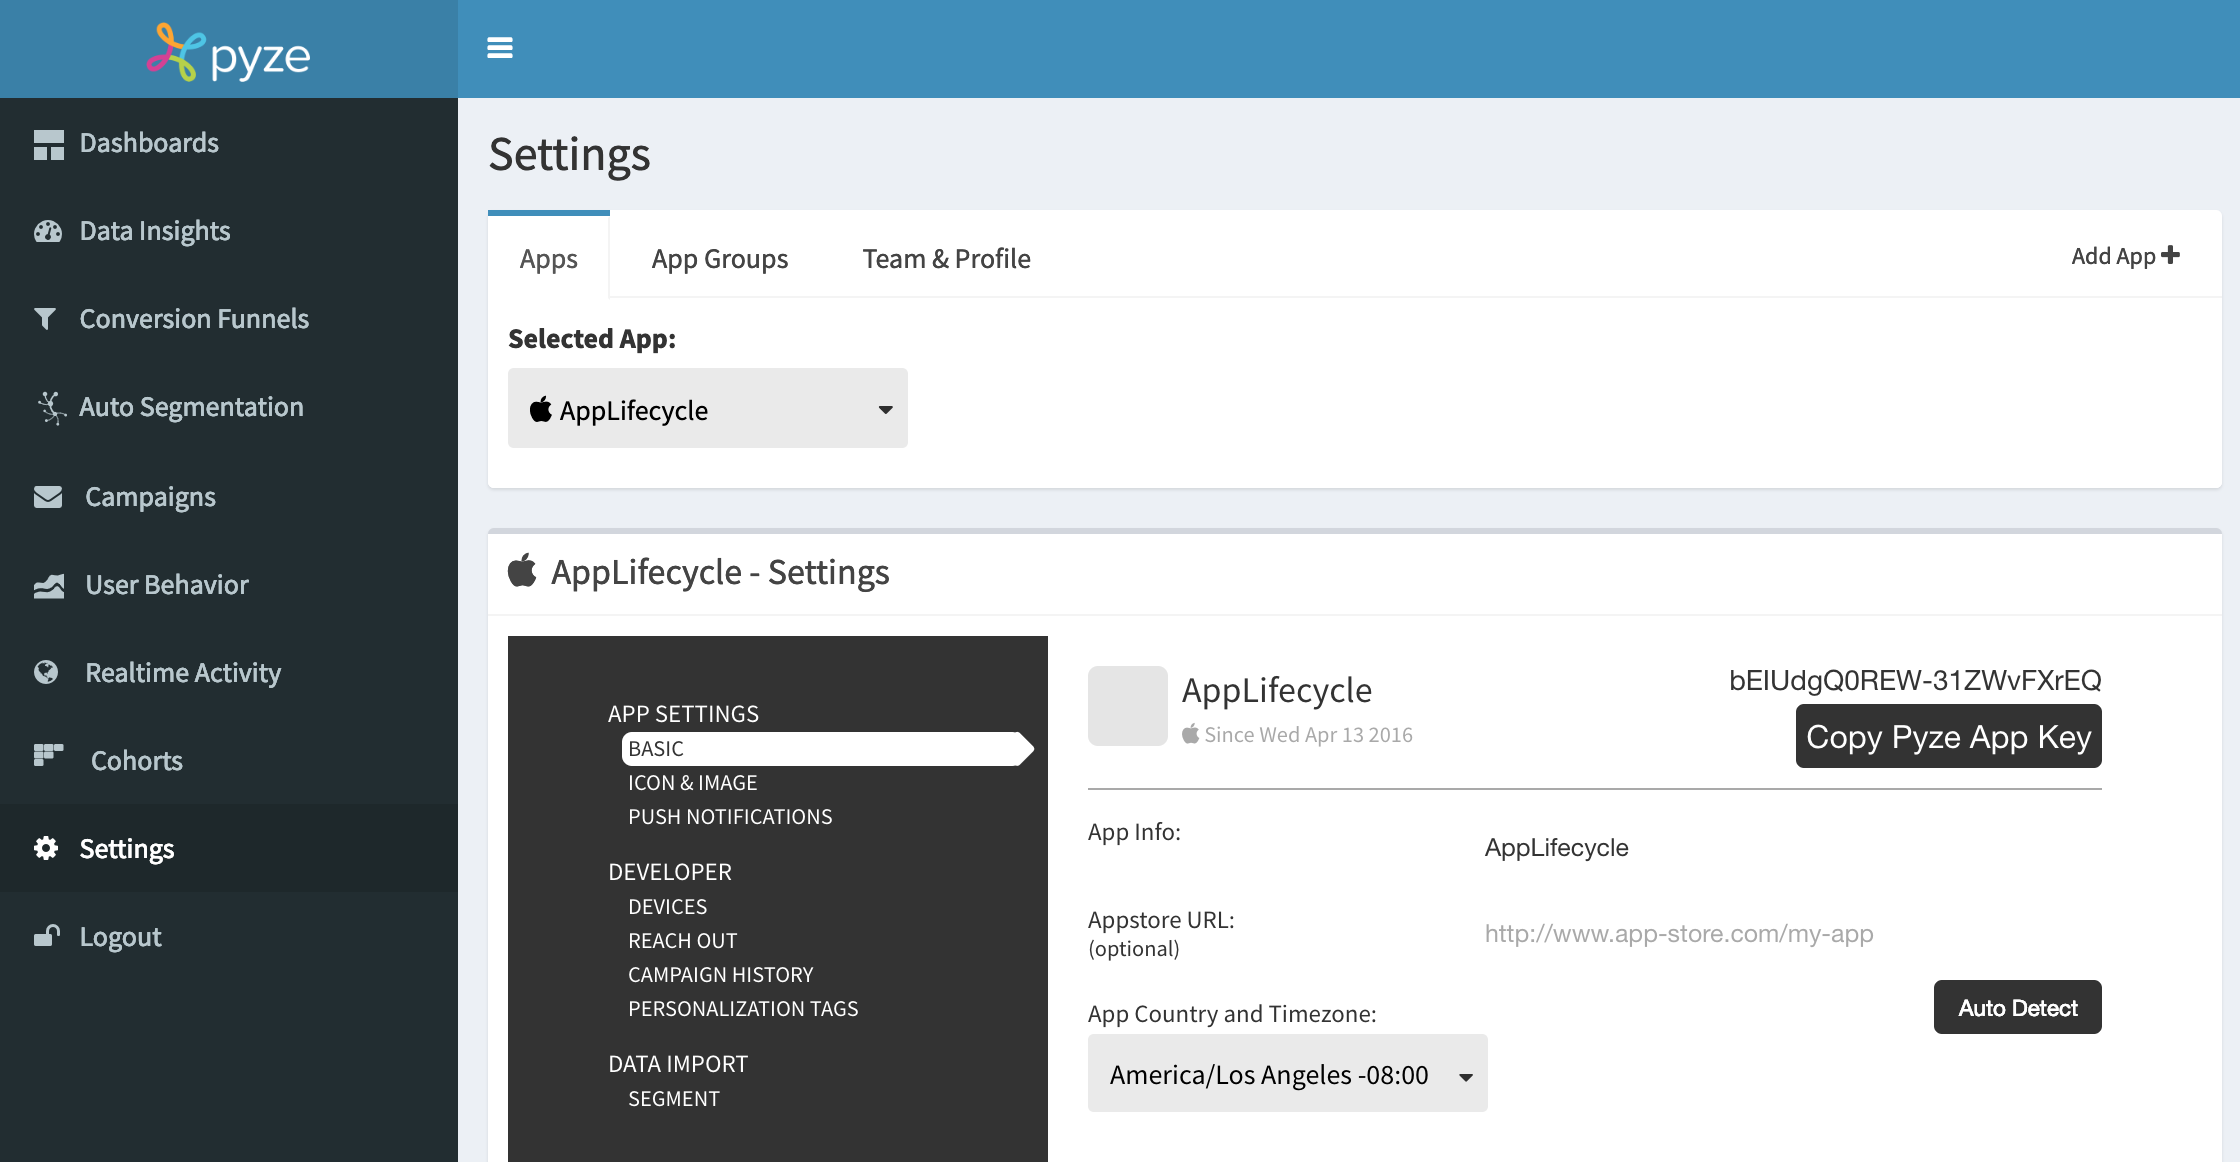
- 左メニューのプッシュ通知を選択します。
- .p12形式のPush通知証明書をアップロードし、p12パスワード(証明書作成時に生成したパスワード)を指定し、プロビジョニングモードを指定します。使用している証明書の種類に応じて、「開発」または「本番」を指定します。

- 1日と1週間のノルマ制限を選択
- 保存をクリックします。
3. プッシュ通知を有効にする
- アプリケーションターゲットの下にあるケイパビリティに移動し、ケイパビリティの
Push NotificationsとBackground Modesを追加します。 Background ModesでRemote notificationsにチェックを入れます。
4. AppDelegateの変更
AppDelegateを以下のように更新します。
@import Pyze;
#import <UserNotifications/UserNotifications.h>

@import CoreMotion;

//Let AppDelegate inherit UNUserNotificationCenterDelegate
@interface ALAppDelegate () <UNUserNotificationCenterDelegate>
@end

@implementation ALAppDelegate

//Initialize Pyze
- (BOOL)application:(UIApplication *)application willFinishLaunchingWithOptions:(NSDictionary *)launchOptions {
 [Pyze initialize:@"PYZE_APP_KEY" withLogThrottling: PyzelogLevelMinimal];
 return YES;
}

//Register for remote notification
- (BOOL)application:(UIApplication *)application didFinishLaunchingWithOptions:(NSDictionary *)launchOptions{
 [[UNUserNotificationCenter currentNotificationCenter] requestAuthorizationWithOptions:(UNAuthorizationOptionAlert +UNAuthorizationOptionSound) completionHandler:^(BOOL granted, NSError * _Nullable error) {}];
 [UNUserNotificationCenter currentNotificationCenter].delegate = self;
 [[UNUserNotificationCenter currentNotificationCenter] setNotificationCategories:[PyzeNotification getPyzeDefaultNotificationCategories]];
 [[UIApplication sharedApplication] registerForRemoteNotifications];
 [PyzeNotification initWithLaunchOptions:launchOptions];
 return YES;
}

//Set remote notification token to Pyze
- (void)application:(UIApplication *)application didRegisterForRemoteNotificationsWithDeviceToken:(NSData *)deviceToken {
 [Pyze setRemoteNotificationDeviceToken:deviceToken];
}

//Notify Pyze when push received.
- (void)application:(UIApplication *)application didReceiveRemoteNotification:(NSDictionary *)userInfo fetchCompletionHandler:(void (^)(UIBackgroundFetchResult))completionHandler{
 [Pyze processReceivedRemoteNotification:userInfo withState:[[UIApplication sharedApplication] applicationState] withCompletionHandler:completionHandler];
}

//Let pyze handle the remote notification action
-(void)userNotificationCenter:(UNUserNotificationCenter *)center didReceiveNotificationResponse:(UNNotificationResponse *)response withCompletionHandler:(void (^)(void))completionHandler{
 [PyzeNotification handlePushNotificationResponseWithUserinfo:response.notification.request.content.userInfo actionIdentifier:response.actionIdentifier];
 completionHandler();
}

//Enable app to view notification in foreground
-(void)userNotificationCenter:(UNUserNotificationCenter *)center willPresentNotification:(UNNotification *)notification withCompletionHandler:(void (^)(UNNotificationPresentationOptions))completionHandler {
 completionHandler(UNNotificationPresentationOptionAlert);
}

@end
import Pyze
import UserNotifications

//Let AppDelegate inherit UNUserNotificationCenterDelegate
@UIApplicationMain
class AppDelegate: UIResponder, UIApplicationDelegate, UNUserNotificationCenterDelegate {

 //Initialize Pyze
 func application(_ application: UIApplication, willFinishLaunchingWithOptions launchOptions: [UIApplication.LaunchOptionsKey : Any]? = nil) -> Bool {
     Pyze.initialize("PYZE_APP_KEY", withLogThrottling: .PyzelogLevelMinimal)
     return true
 }

 //Register for remote notification
 func application(_ application: UIApplication, didFinishLaunchingWithOptions launchOptions: [UIApplication.LaunchOptionsKey: Any]?) -> Bool {
     UNUserNotificationCenter.current().delegate = self;
     UNUserNotificationCenter.current().requestAuthorization(options:[.badge, .alert, .sound]) { granted, error in }
     UNUserNotificationCenter.current().setNotificationCategories(PyzeNotification.getPyzeDefaultNotificationCategories() as! Set<UNNotificationCategory>);
     UIApplication.shared.registerForRemoteNotifications();
     PyzeNotification.initWithLaunchOptions(launchOptions);
     return true
 }

 //Set remote notification token to Pyze
 func application(_ application: UIApplication, didRegisterForRemoteNotificationsWithDeviceToken deviceToken: Data) {
     Pyze.setRemoteNotificationDeviceToken(deviceToken);
 }

 //Notify Pyze when notification received
 func application(_ application: UIApplication, didReceiveRemoteNotification userInfo: [AnyHashable : Any], fetchCompletionHandler completionHandler: @escaping (UIBackgroundFetchResult) -> Void) {
     Pyze.processReceivedRemoteNotification(userInfo, with: application.applicationState, withCompletionHandler: completionHandler)
 }

 //Let pyze handle the remote notification action
 func userNotificationCenter(_ center: UNUserNotificationCenter, didReceive response: UNNotificationResponse, withCompletionHandler completionHandler: @escaping () -> Void) {
     PyzeNotification.handlePushResponse(withUserinfo: response.notification.request.content.userInfo, actionIdentifier: response.actionIdentifier)
     completionHandler()
 }

 //Enable app to view notification in foreground
 func userNotificationCenter(_ center: UNUserNotificationCenter, willPresent notification: UNNotification, withCompletionHandler completionHandler: @escaping (UNNotificationPresentationOptions) -> Void) {
     completionHandler(.alert);
 }
}
5. アプリのリッチプッシュ通知を有効にする
アプリがプッシュ通知メッセージ内で画像やGIFを受信できるようにします。
- ファイル] -> [新規作成] -> [ターゲット]に移動し、通知サービス拡張子を作成します。
- 製品名を入力し、必要な言語を選択します。
- プロジェクトとしてアプリケーションに埋め込むを選択してください。
- 上記の拡張機能を追加すると、XCodeはNotificationServiceクラスを作成します。その内容を以下のコードで置き換えてください。
#import "NotificationService.h"

@interface NotificationService ()

@property (nonatomic, strong) void (^contentHandler)(UNNotificationContent *contentToDeliver);
@property (nonatomic, strong) UNMutableNotificationContent *bestAttemptContent;

@end

@implementation NotificationService

- (NSURL *) attachmentFileURLWithTempLocation:(NSURL *)location name:(NSString *)fileName {
 NSFileManager *fileManager = [NSFileManager defaultManager];
 NSError *error;
 NSArray * domainDirectories = NSSearchPathForDirectoriesInDomains(NSDocumentDirectory, NSUserDomainMask, YES);
 NSString *documentsDirectory = [domainDirectories objectAtIndex:0];
 NSString *attachmentLocalFilePath = [documentsDirectory stringByAppendingPathComponent:@"/Pyze/"];
 if(![fileManager fileExistsAtPath:attachmentLocalFilePath]) [fileManager createDirectoryAtPath:attachmentLocalFilePath withIntermediateDirectories:NO attributes:nil error:&error];
 attachmentLocalFilePath =  [attachmentLocalFilePath stringByAppendingFormat:@"/%@",fileName];
 if([fileManager fileExistsAtPath:attachmentLocalFilePath]) {
     [fileManager removeItemAtPath:attachmentLocalFilePath error:&error];
     if (error) NSLog(@"Error in removing file : %@", error.debugDescription);
 }
 [fileManager moveItemAtPath:[location path] toPath:attachmentLocalFilePath error:&error];
 if (error) NSLog(@"Error in moving file to location : %@", error.debugDescription);
 NSURL *mediaFileURL = [NSURL fileURLWithPath:attachmentLocalFilePath];
 return mediaFileURL;
}

- (NSURLSessionDownloadTask *) loadAttachmentsWithURLString:(NSString *)urlString {
 NSURL *mediaURL = [NSURL URLWithString:urlString];
 NSURLSessionDownloadTask *task = [[NSURLSession sharedSession] downloadTaskWithURL:mediaURL completionHandler:^(NSURL * _Nullable location, NSURLResponse * _Nullable response, NSError * _Nullable error) {
       if (!error) {
           NSURL *mediaFileURL = [self attachmentFileURLWithTempLocation:location name:[response suggestedFilename]];
           UNNotificationAttachment *attachment = [UNNotificationAttachment attachmentWithIdentifier:[response suggestedFilename] URL:mediaFileURL options:nil error:&error];
           if (attachment) self.bestAttemptContent.attachments = @[attachment];
           self.contentHandler(self.bestAttemptContent);
       }
   }];
 return task;
}

#pragma mark - UNNotificationServiceExtension delegate

- (void)didReceiveNotificationRequest:(UNNotificationRequest *)request withContentHandler:(void (^)(UNNotificationContent * _Nonnull))contentHandler {
 self.contentHandler = contentHandler;
 self.bestAttemptContent = [request.content mutableCopy];
 self.bestAttemptContent.title = self.bestAttemptContent.title;
 self.bestAttemptContent.subtitle = self.bestAttemptContent.subtitle;
 NSString *mediaUrlString = request.content.userInfo[@"mediaUrl"];
 NSURLSessionDownloadTask *task = [self loadAttachmentsWithURLString:mediaUrlString];
 [task resume];
}

- (void)serviceExtensionTimeWillExpire {
 // Called just before the extension will be terminated by the system.
 // Use this as an opportunity to deliver your "best attempt" at modified content, otherwise the original push payload will be used.
 self.contentHandler(self.bestAttemptContent);
}

@end
import UserNotifications

class NotificationService: UNNotificationServiceExtension {

 var contentHandler: ((UNNotificationContent) -> Void)?
 var bestAttemptContent: UNMutableNotificationContent?

 override func didReceive(_ request: UNNotificationRequest, withContentHandler contentHandler: @escaping (UNNotificationContent) -> Void) {
     self.contentHandler = contentHandler
     bestAttemptContent = (request.content.mutableCopy() as? UNMutableNotificationContent)
     defer {
         contentHandler(bestAttemptContent ?? request.content)
     }
     guard let attachment = request.attachment else { return }
     bestAttemptContent?.attachments = [attachment]
 }

 override func serviceExtensionTimeWillExpire() {
     // Called just before the extension will be terminated by the system.
     // Use this as an opportunity to deliver your "best attempt" at modified content, otherwise the original push payload will be used.
     if let contentHandler = contentHandler, let bestAttemptContent =  bestAttemptContent {
         contentHandler(bestAttemptContent)
     }
 }
}

extension UNNotificationRequest {
 var attachment: UNNotificationAttachment? {
     guard let attachmentURL = content.userInfo["mediaUrl"] as? String, let imageData = try? Data(contentsOf: URL(string: attachmentURL)!) else {
         return nil
     }
     return try? UNNotificationAttachment(data: imageData, options: nil)
 }
}

extension UNNotificationAttachment {
 convenience init(data: Data, options: [NSObject: AnyObject]?) throws {
     let fileManager = FileManager.default
     let temporaryFolderName = ProcessInfo.processInfo.globallyUniqueString
     let temporaryFolderURL = URL(fileURLWithPath: NSTemporaryDirectory()).appendingPathComponent(temporaryFolderName, isDirectory: true)
     try fileManager.createDirectory(at: temporaryFolderURL, withIntermediateDirectories: true, attributes: nil)
     let imageFileIdentifier = UUID().uuidString + ".jpg"
     let fileURL = temporaryFolderURL.appendingPathComponent(imageFileIdentifier)
     try data.write(to: fileURL)
     try self.init(identifier: imageFileIdentifier, url: fileURL, options: options)
 }
}
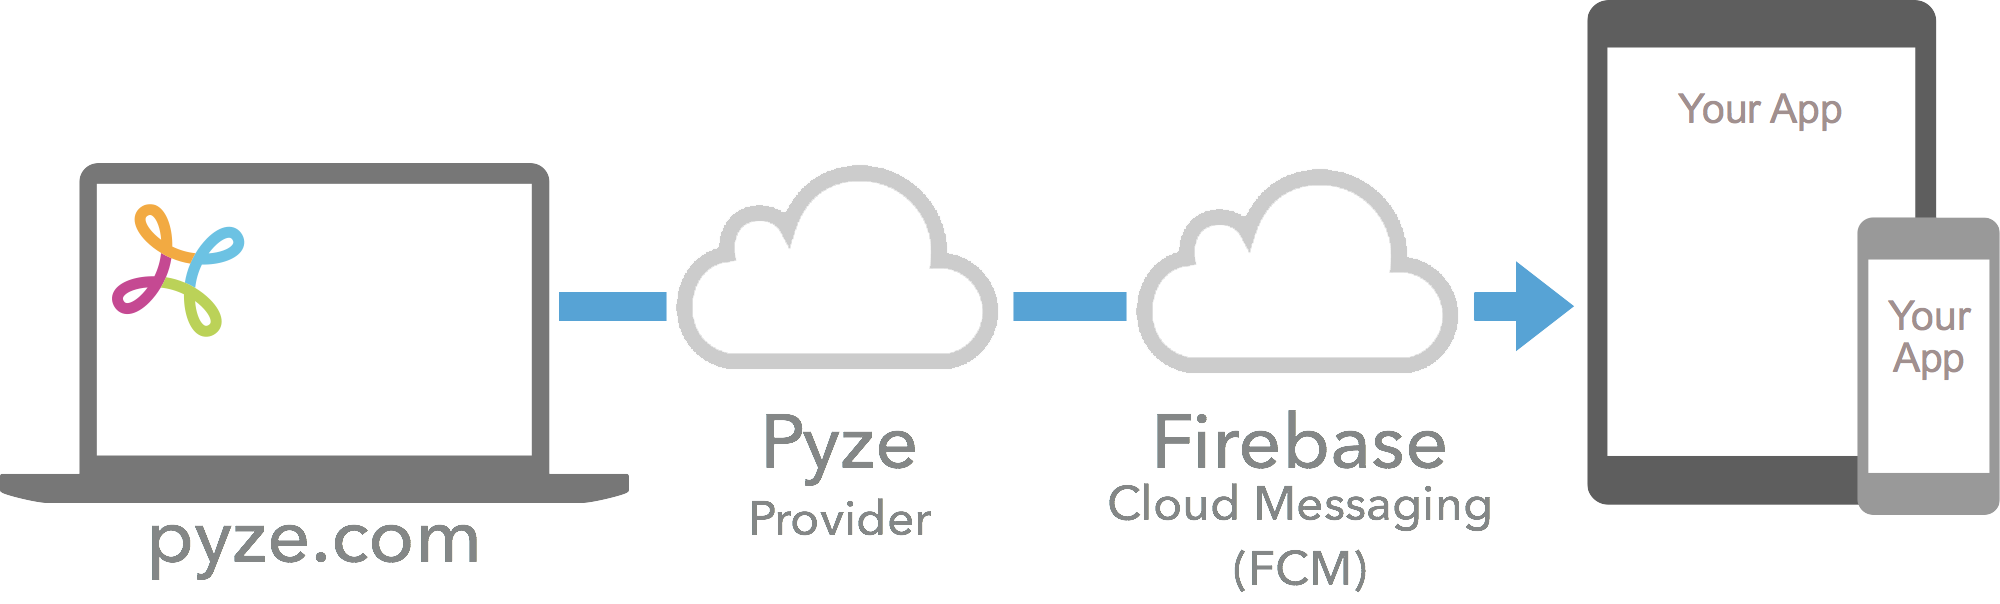
Android プッシュ通知
GoogleはFirebase Cloud Messagingサービス(FCM)を提供し、アプリパブリッシャーがプッシュ通知でユーザーにリーチできるようにしている。
pyzeでFirebaseの資格情報を設定する
Login into your Firebase Console
1.プロジェクトを選択し、プロジェクト名の横にある設定アイコンをクリックします。
2.クラウド メッセージング タブで、レガシー サーバー キーと送信者 ID を検索します。
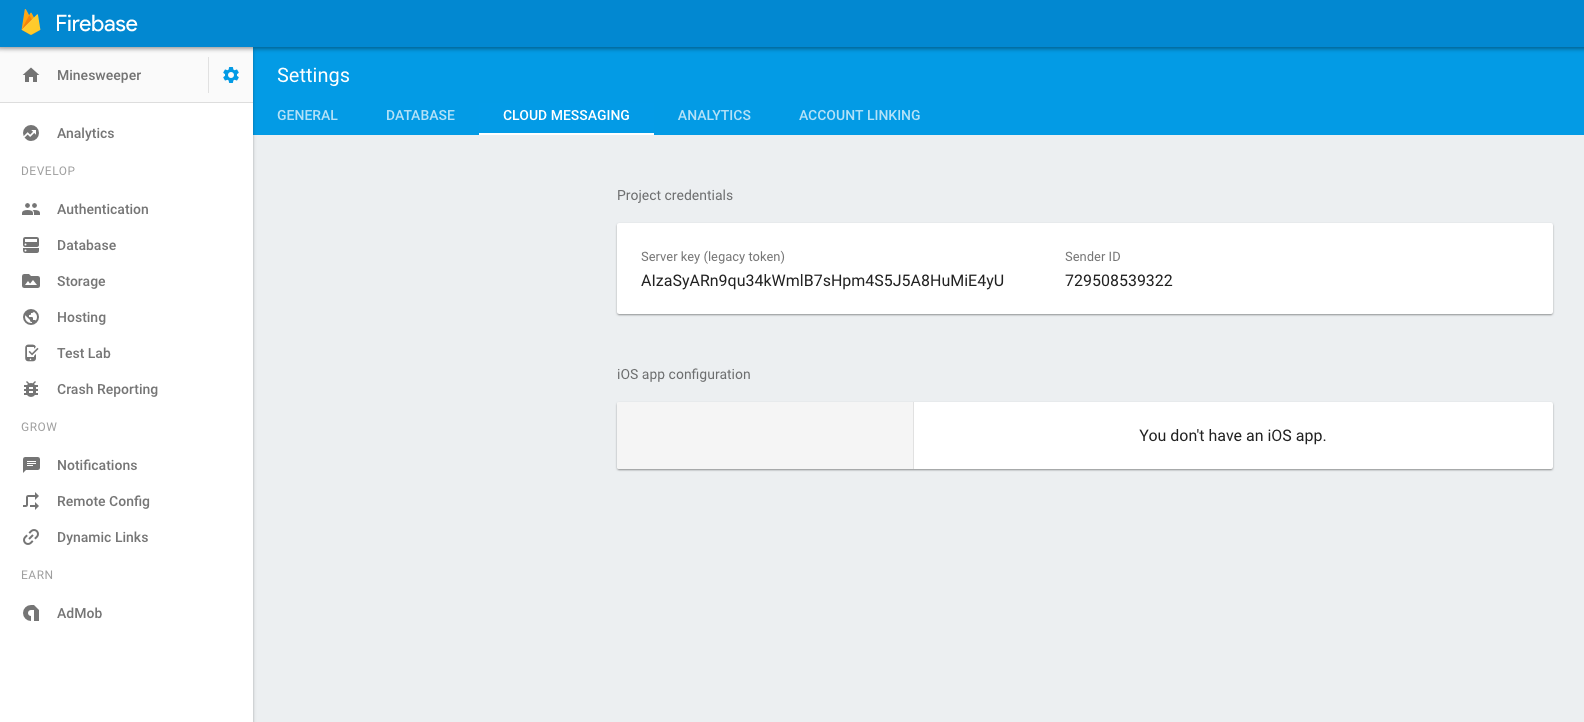
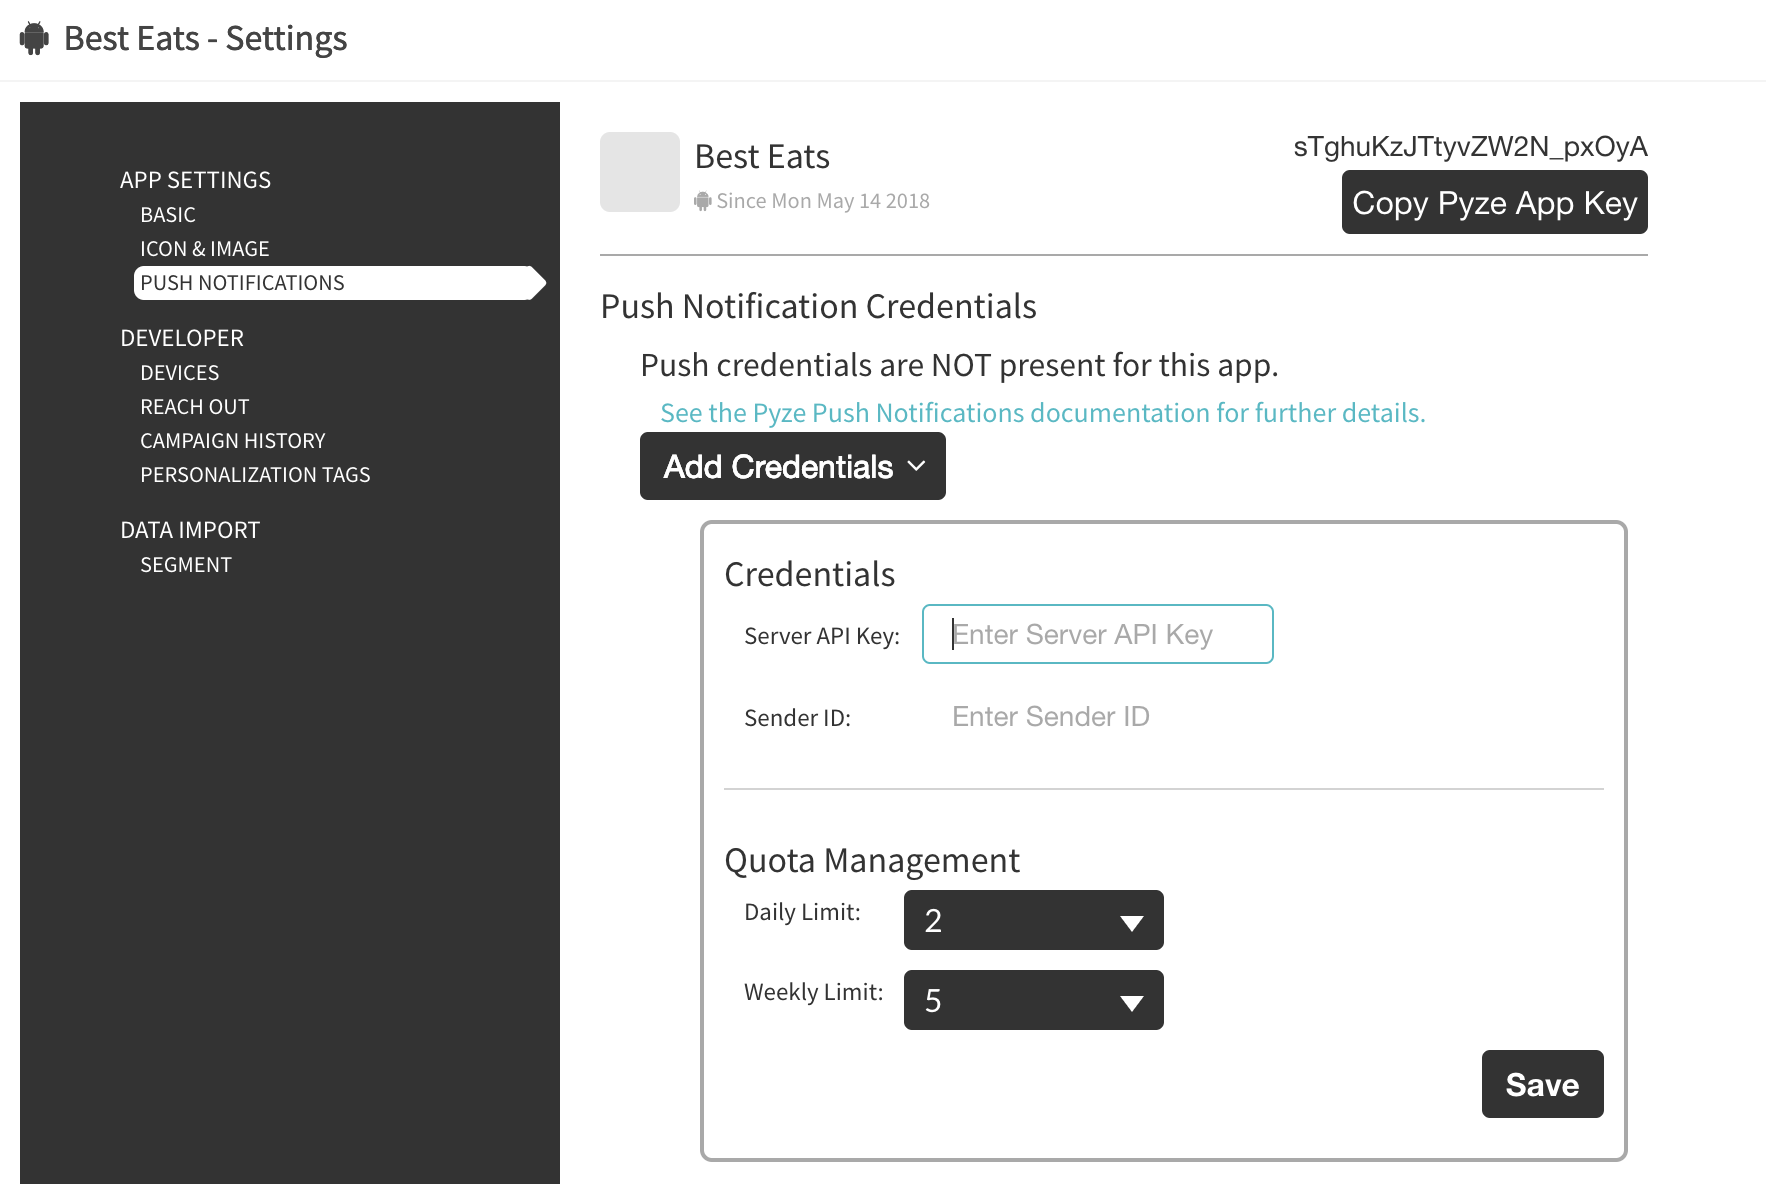
1.設定ページで、ドロップダウンメニューからアプリを選択します。
2.アプリの設定ページで、左側のペインからプッシュ通知の設定に移動します。
3.サーバーキーと送信者IDを入力し、アプリが1日と1週間に送信できるプッシュメッセージの最大数を制限します。
FCM プッシュ通知をアプリプロジェクトに統合する
ルートレベルの build.gradle ファイルに以下のルールを追加し、google-services プラグインを含めるようにします。
buildscript {
    // ...
    dependencies {
        // ...
        classpath 'com.google.gms:google-services:---Latest-Version---'
    }
}
モジュールのGradleファイル(通常はapp/build.gradle)で、ファイルの一番下にプラグインを適用する行を追加して、Gradleプラグインを有効にします。
apply plugin: 'com.android.application'

android {
    // ...
}

dependencies {
    // ...
}

// ADD THIS AT THE BOTTOM
apply plugin: 'com.google.gms.google-services'
以下の依存関係をアプリのbuild.gradleファイルに追加します。
dependencies {
    compile "com.google.firebase:firebase-messaging:---Latest-Version---"
}
最新版はいつでもBintrayから入手できます。
Android.Manifestファイルで、Application Tagの間に以下を追加します。
<receiver android:name="com.pyze.android.push.PyzePushTrackingReceiver" android:exported="true"/>
<service
    android:name="com.pyze.android.push.fcm.FcmPushListenerService">
    <intent-filter>
        <action android:name="com.google.firebase.MESSAGING_EVENT" />
    </intent-filter>
</service>
アプリケーションに google-services.json を追加します。
カスタム通知画像
カスタム通知アイコン画像(デフォルトではアプリアイコンが使用されます)を指定するには、pyze_notification_iconとpyze_notification_icon_transperentという名前のプロジェクトの描画可能なフォルダに2つのアイコン画像を配置します。
プッシュ通知処理オプション
Pyze SDK は、基本的なプッシュメッセージとリッチプッシュメッセージの登録と表示をデフォルトで処理します。しかし、表示をカスタマイズしたり、何らかのアクションを実行したい場合など、Push Notificationsの登録を自分で行いたい場合があるかもしれません。
組み込みの表示を使用する
- プッシュ受信イベントの登録
Pyze.registerForPushNotification(IPyzePushListener listener);
- プッシュメッセージを受信したら、以下のメソッドを呼び出してメッセージを表示します。
Pyze.showPushNotification(PyzePushMessage pushMessage);
- 使用法
Pyze.registerForPushNotification(new IPyzePushListener() {
    @Override
    public void onPushNotificationReceived(PyzePushMessage pyzePushMessage) {
        //Perform some operation and then ask Pyze to display the notification
        Pyze.showPushNotification(pyzePushMessage);
    }
});
独自のカスタム表示を使用する
- プッシュ受信イベントの登録
Pyze.registerForPushNotification(IPyzePushListener listener);
- 使用法。
Pyze.registerForPushNotification(new IPyzePushListener() {
    @Override
    public void onPushNotificationReceived(PyzePushMessage pyzePushMessage) {
        //Perform internal app operation to your app eg: downloading content in the
        // background.
    }
});
高度な機能
登録を手動で処理するか、FCMのセットアップを自分で実装しているが、Pyzeのプッシュ通知機能を利用したい場合は、以下の方法で設定してください。
登録トークンをPyzeに渡す
@Override
public void onTokenRefresh() {
    super.onTokenRefresh();
    ...
    ...
    Pyze.setPushToken(FirebaseInstanceId.getInstance().getToken());
}
受信したプッシュメッセージがPyzeからのものであれば、プッシュメッセージを渡して以下のメソッドを呼び出します。で述べたように自分で処理するか、以下のようにPyzeに処理を任せることができます。
@Override
public void onMessageReceived(RemoteMessage remoteMessage) {
    super.onMessageReceived(remoteMessage);
    if(remoteMessage.getData().get("pnty").equals("pyze")){
        PyzePushMessage message = new PyzePushMessage(remoteMessage.getData());
        //Handle displaying push notification manually or through Pyze
        Pyze.showPushNotification(message);
    }
}
UI処理オプションの詳細については、Androidドキュメントを参照してください。
アプリ内通知
アプリ内通知は、アプリを使用しているユーザーがアプリを使用した際に、アプリビジネスがユーザーに連絡を取ることを可能にします。アプリ内通知はpyze sdkに組み込まれており、追加の依存関係はありません。企業はDynamic FunnelsやIntelligence Explorerから手動で、Growth Automationからワークフローやキャンペーンに基づいて自動的にユーザーに連絡することができます。アプリ内通知は、新しいメッセージをチェックし、通知でモーダルをポップアップさせたい場所はどこでも、次のmethedを呼び出すCampaignsから送信することができます。
showInAppNotification(callback);
デバッグとロギング
プラットフォーム固有の情報については、ios と android のドキュメントを参照してください。